CPTS: Tactics & Survival
📖 Introduction — A Tactical Field Guide to the CPTS Exam
I’m not going to sugarcoat it: this exam is tough. Not in the way CTFs are tough, where you’re trying to guess obscure tricks — but in the way real internal engagements challenge you: with incomplete information, technical constraints, and the constant need to adapt, pivot, and prioritize. CPTS is not just about breaking into machines. It’s about doing so with intent, structure, and a consultant’s mindset.
So, this isn’t just a feel-good writeup or a flag-by-flag retelling. This is a deep, practical dive into everything I learned, experienced, refined, and struggled with across the entire CPTS journey — from prep to reporting. Think of this as a battle-tested field manual, shaped by long nights, failed pivots, accidental resets, and that oh-so-familiar sinking feeling when your last tunnel breaks at 2AM.
I wrote this to document the real experience — the technical layers, the psychological walls, the methodology breakdowns, the flags that almost broke me, and the workflow that pulled me back on track. It’s part review, part tactical survival guide, and part mental debrief. It includes tool recommendations, decision-making tips, stuck scenarios, workflow notes, and everything I wish someone had told me before I clicked “Begin Exam.”
It’s long. It’s dense. It’s personal. And it’s designed to help you not just pass CPTS, but own the process.
🧠 What is CPTS, and Why It Matters
The Hack The Box Certified Penetration Testing Specialist (CPTS) exam is, in my opinion, the closest simulation of a real-world internal penetration test you can get in a certification.
This isn’t a gamified CTF or a glorified quiz. It’s an operational simulation: a full-scope internal engagement on a segmented corporate-like network, where you’ll be dropped into a semi-realistic infrastructure, expected to enumerate, exploit, pivot, escalate, and document your findings — all under pressure, with limited time and no hand-holding.
You’re not just proving you can pwn a box — you’re proving you can:
- Maintain persistence across hops
- Analyze trust relationships
- Understand how various machines interact together inside a network
- Abuse Active Directory like a professional adversary
- Juggle tunneling tools and chain recon flows
- Write a professional-grade report that would actually land on a client’s desk
CPTS isn’t about being flashy — it’s about being: methodical, efficient, and report-ready. And that’s exactly what makes it so valuable for red teamers, aspiring internal pentesters, and anyone serious about treating offensive security as more than just a hobby.
✴️ Preparation Starts Here
⚔️ How I Prepared: Tools and Tactical Notetaking
📚 The Academy Path — The Real Deal
Let’s get this out of the way: the HTB Academy CPTS path is not filler.
I went through every module, no skipping. Some modules were fun, some were dry, but every one of them taught me something that directly applied in the exam — especially when it came to methodology under pressure.
That’s the key. This path isn’t just teaching you tools; it’s teaching you workflows, lateral movement logic, post-exploitation thought processes, and ways to turn noisy shells into useful access.
I took extensive notes while going through the modules — which leads us to the next critical point.
🗃️ Building a Living Field Manual
I didn’t just “take notes.” I built a living methodology library.
- Structured using Obsidian with over 100 Nodes
- Organized by phase: Recon → Exploitation → Post-Exploitation → Pivoting → Reporting
Each node contained:
- Use cases
- Syntax examples
- Command variations
- Real-world edge cases
- Mistake logs (what went wrong in past tests and why)
- Theory related to the technique
I created checklists for Web, Linux, Windows enumeration and exploiting, mapped out attack chains (Kerberoasting → Silver Ticket → DCSync), and wrote mental models for how to approach trust relationships and nested pivots.
During the exam, this field manual was my only reference. No Discord, no guesswork — just me, my notes, and my method.
🎥 Watching Strategically: IppSec’s CPTS Playlist
Before the exam, I worked through IppSec’s unofficial CPTS prep playlist.
But I didn’t just watch passively and followed the walktrough to complete the machine.
For each video, I paused at every pivot and asked myself:
- “What would I do here?”
- “Is my recon too shallow to see this?”
- “Did I build my notes to cover this scenario?”
This wasn’t about walkthroughs. This was about auditing my thought process.
Watching how IppSec builds chains, structures recon, and breaks assumptions helped me spot blind spots in my own flow. And that paid off massively in the exam.
🧪 Stress Testing Methodology in ProLabs
Once I had the theory and tooling down, I turned to ProLabs — specifically Dante and Zephyr — to test my readiness.
These environments aren’t designed to teach you new tricks. They’re meant to break your workflow — to introduce noise, distractions, segmentation, and dead-ends. And that’s exactly why they’re useful.
I practiced like it was the exam:
- No walkthroughs
- Timed sessions
- Daily reporting
- Obsidian-only for notes
And guess what? I got stuck. A lot. But every time I escaped a trap or completed a path, I added it to my methodology and checklist — which became my lifeline during the actual CPTS exam.
🧠 Take AEN Completely Blind
The Attacking Enterprise Networks (AEN) lab is probably the closest training experience to the actual CPTS exam. It teaches:
- Multi-domain enumeration
- Credential harvesting and chaining
- Tunnel configuration under realistic segmentation
- Multi-hop lateral movement
- Report writing for real-world attack chains
Here’s what I did:
- Took AEN completely blind — no hints, no solutions, no Discord
- Set a 5-day time cap
- Treated it like a live engagement: methodical recon, screenshot management, real documentation
The point isn’t to finish it fast — it’s to simulate the mental workload of the exam.
That said, the CPTS exam is not “AEN Part II.” It’s a different beast, with different goals. AEN teaches you methodology and pacing — but the exam demands consistency, clarity, and sustained problem-solving across ten days.
One of the biggest mental traps is thinking,
“This worked in AEN, so why isn’t it working here?”
or
“This box feels like that one from AEN — maybe it’s the same vector.”
Don’t fall for it. Every flag in CPTS is custom-placed. Treat the exam as a fresh, unfamiliar engagement. The only thing you should bring from AEN is your workflow — not your assumptions.
✴️ Methodology Starts Here
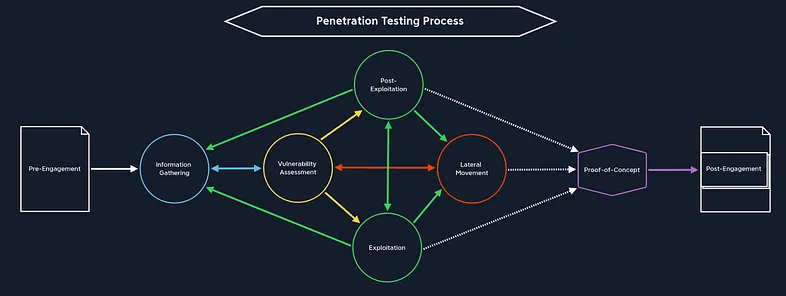
🧭 Information Gathering — Reconnaissance as a Discipline
In CPTS, information gathering isn’t something you “do once at the beginning.” It’s an ongoing, iterative process that evolves as you unlock new pivots, gain new credentials, and expand your network visibility. If exploitation is the art of action, then information gathering is the science of visibility — and mastering it is non-negotiable.
Whether you’re facing a hardened external service, a custom web app, or the first glimpse of Active Directory, your ability to collect, process, and contextualize information defines your pace and your success.
Let’s break down each dimension of reconnaissance in the CPTS experience.
🔍 Services Enumeration
This is your first step in every new network segment. Each host you encounter is a potential goldmine of exposed services, misconfigured ports, or behavioral clues. The exam expects you to know how to identify and fingerprint common services and draw strategic conclusions from that information.
Core Techniques:
- Banner Grabbing: Manual interaction with services using tools like nc, telnet, openssl, or nmap -sV to retrieve version info.
- Version Inference: Comparing exposed service behavior or headers to known fingerprint signatures.
- Banner Grabbing: Manual interaction with services using tools like
nc,telnet,openssl, ornmap -sVto retrieve version info.
Key Protocols & Services You’ll Likely Encounter:
- DNS
- FTP / TFTP
- LDAP
- WinRM
- WMI
- MySQL / MSSQL / Oracle TNS
- NFS
- SMB / NetBIOS
- POP3 / IMAP / SMTP
- RDP / SSH / IPMI
- Rsync / R-Service
- SNMP
- Kerberos
Go-to Tools:
nmapwith targeted scripts: e.g.,--script smb-enum-shares,ldap-search,snmp-infotcpdumporWireshark: Validate behavior, confirm service availability, observe broadcast trafficnetcatortelnet: Banner grabbing
🧠 CPTS Tip: Organize your scans by purpose. Start with fast sweeps (
nmap -T4 --top-ports 1000), then expand with full TCP/UDP scans per host based on significance. Don’t blindly run-Aor-p-on everything — that’s how you get noisy and wasteful.
🌐 Web Enumeration
The CPTS exam is packed with web interfaces — some internal, some custom, many deceptive. Learning to approach them methodically and understand their logic is crucial.
🔎 Active Web Recon
These are the noisy techniques — but essential when used surgically
- Directory and Page Fuzzing: Tools like
ffuf,dirsearch, orferoxbusterwith custom and general wordlists (SecLists, robots.txt leaks, known paths from CMSs) - Parameter and Value Fuzzing: Great for discovering hidden GET/POST
parameters, testing auth logic or finding vulnerable paths like
debug=true. - VHost Discovery: Using tools like
ffuf -H "Host: FUZZ.target"with known DNS entries or certificate parsing - Header Analysis: Look at cookies, server headers, CORS policies, cache behavior
🛡️ Passive Web Recon
Sometimes the best enumeration is silent. Use passive tools before active
fuzzing, especially when assessing exposed services.
- Google Dorks: Leak detection, repo finds, forgotten staging apps
- Technology Stack Analysis: Tools like
wappalyzer,whatweb,builtwith, or headers via Burp/HTTPx. - DNS and Certificate Recon: Using tools like
crt.sh,amass,certspotter, ordnscanto fingerprint internal infra
Tools You Should Know Well:
FinalRecon: Swiss-army knife for passive reconSpiderfoot: Automated passive OSINT (note: requires tweaking to avoid noise)Recon-ng: Good for linked enumeration and correlating datatheHarvester: Simple but great for emails and DNS recordsEyewitness: Captures screenshots of web portals across subdomains — great for internal pivot recon- OSINT Framework: Reference chart to explore passive enumeration targets
🧱 Application Fingerprinting
Throughout the CPTS exam, you’ll encounter real-world applications: enterprise tools, CMSs, ticketing systems, or internal dashboards. The key is recognizing them fast and checking for known attack surfaces — but also understanding that sometimes the flaws are logic-based, not CVE-based.
Recognizable Apps You Should Be Able to Enumerate and Attack:
- CMSs: WordPress, Joomla, Drupal, DotNetNuke
- DevOps: Jenkins, GitLab
- Monitoring: PRTG Network Monitor, Nagios XI, Splunk
- Web Servers: Apache Tomcat, ColdFusion, WebSphere, WebLogic, Axis2
- Ticketing Systems: osTicket (especially common), internal CRMs or dashboards
🧠 What you need is not just CVE knowledge, but the ability to recognize:
- Default credentials or misconfigurations
- Hidden admin portals (
/admin,/manage,/super) - Debug or backup endpoints (
.bak,/debug,?stage=)
If you’re treating every web app like an FFUF target, you’re missing the bigger picture. You need to start walking the app manually and watching how it handles user state, access control, and misbehavior.
🧠 Active Directory Enumeration (Initial Stages)
When you land in a domain-joined machine, enumeration doesn’t start with BloodHound — it starts with understanding the domain.
What You Should Enumerate First:
- Domain Structure: Name, FQDN, SID, Forest/Trust relationships
- Users & Groups: Especially low-priv users with domain-wide access
- Privileged Accounts: DAs, Backup Operators, Print Operators, etc.
- ACLs: Often the key to hidden privilege escalation paths
- Password Policies: Is password spraying viable? Is PASSWD_NOTREQD set?
- Security Controls: Defender, LAPS, GPO-enforced constraints
- Shares: SYSVOL, Netlogon, shared config repos
Core Tools You Must Be Fluent With:
BloodHound/SharpHound(collection, import, edge analysis)PowerView(manual edge validation, group enumeration, ACL analysis)NetExec(mass authentication testing, SMB/LDAP enumeration)ldapsearch,rpcclient,windapsearch,pingcastle,adidnsdumpetc.
🧠 CPTS Tip: Create AD Enumeration Trees per box. Track what commands have been run, what edge was found, and how you validated it.
✅ Summary of What This Section Taught Me:
- Network Services: Banner grabbing, targeted scanning, protocol-specific recon
- Web Recon: Deep fuzzing, session logic analysis, passive fingerprinting
- App Enumeration: CMS behavior profiling, DevOps tool quirks, admin panel hunting
- AD Initial Recon: Manual + automated domain intelligence gathering
In the CPTS exam, enumeration isn’t just the first step — it’s half the battle, and the part where many people fail simply because they don’t treat recon like a first-class citizen.
⚙️ Pre-Exploitation — Weaponization & Gaining Initial Access
Pre-exploitation is the often-overlooked bridge between reconnaissance and full exploitation. It’s where information becomes actionable. In the CPTS exam, this is where you’ll spend a good chunk of time validating assumptions, crafting payloads, testing footholds, and preparing the foundation for lateral movement.
The exam doesn’t hand you vulnerable boxes with obvious paths. Instead, it expects you to assemble the pieces from recon and translate them into a valid, stable, and stealthy point of entry. This stage is also critical for payload delivery, shell handling, and execution strategies.
Let’s break down the mechanics of this phase in the way the exam demands.
💣 Shells: From Initial Access to Stable Control
Before you escalate or move laterally, you need to first get a working shell — and then make sure it’s one you can actually use.
🧱 Shell Types You’ll Work With:
- Web Shells:
Often your first access comes from an upload vulnerability (e.g., through a misconfigured WordPress plugin or a poorly validated LFI-to-RCE). These give you limited, often broken access, but they’re enough to plant something stronger. - Reverse Shells:
The gold standard for initial access. Most often you’ll trigger these through command injection, file uploads, or manual execution paths. The key is not just getting the shell — it’s getting it back through potentially firewalled, segmented, or non-default ports. - Interactive Shells:
Once you have a shell, stabilize it. Use tools likepython -c 'import pty; pty.spawn("/bin/bash")', or PowerShell commands to get an interactive session with tab completion, environment awareness, and TTY access.
🧠 CPTS Tip: Always stabilize the shell before moving forward. Broken shells = missed information = dead-end escalation paths.
🧪 Payload Crafting & Delivery
The exam expects you to be comfortable creating and tweaking your own payloads, not just downloading something from ExploitDB.
🛠️ Tools You’ll Need:
msfvenom: used to generate raw reverse shell payloads for various platforms.- You should also know how to encode payloads using formats like
base64,hex, or PowerShell-friendly forms to bypass filters. searchsploit: while not always necessary, you might want to identify a CVE with a known exploit path. But don’t treat searchsploit as your crutch. More often than not, you’ll be chaining a simple misconfig or logic bug into your own crafted entry point.- Manual Payloads: CPTS shines when it throws you into custom web apps or legacy software where Metasploit is useless.
🧠 CPTS Tip: You’re expected (for example) to know what “file upload vulnerability” actually means. It’s not about getting a web shell — it’s about understanding MIME types, extension filtering, directory traversal, file replacement, and execution context.
📦 Payload Delivery Tactics
Depending on the access vector, you’ll need to be fluent in one or more of these delivery methods:
- Web Uploads
- Upload a payload through a web interface (e.g., a CMS media manager)
- Bypass filters (e.g., extension checking, content-type validation)
- Abuse directory traversal (
../../) to reach executable directories - Drop
webshell.php,cmd.jsp, or a one-liner reverse shell
- File Inclusion / RFI
- Use exposed LFI or RFI to pull your payload from an HTTP server you control
- Base64-encode payloads to pass filters, then decode on target
- SMB Fetch / UNC Paths
- On Windows, use UNC paths (
\\\\attacker_ip\\share\\file.exe) to pull down binaries - SMB servers via
impacket-smbserver.pymake this trivial
- On Windows, use UNC paths (
- PowerShell & Certutil
- Encode payloads as base64 and execute via PowerShell
- Use
certutil -urlcache -split -fto download payloads from your controlled HTTP server
🧠 CPTS Tip: You won’t always get GUI upload forms. Often, you’ll find obscure script paths, API endpoints, or internal logic that lets you write files — or include external ones.
🔐 Setting the Stage for Exploitation
Once you have access, stabilize and prep. This is where “post-pre-exploitation” begins:
- Create a working directory on the target (e.g.,
/tmp/.you/orC:\Users\Public\) - Use common recon scripts (e.g.,
whoami,hostname,ipconfig /all,netstat) - Set up your tunnels and forward ports back to your attacker box
- Start logging everything — you may only get one chance before the target reboots
🔁 Loop this process. Every new access point might require a different shell type or delivery technique. You will likely repeat this cycle multiple times as you move deeper into the network.
✅ Summary of What This Section Taught Me:
- Shells: Stabilization, reverse shell crafting, pty upgrades
- Payloads: Manual crafting, encoding, chaining execution paths
- Delivery: Upload bypasses, RFI/LFI abuse, Linux & Windows file transfer
- Tools:
msfvenom,nc,socat,impacket,PowerShell loaders
This phase taught me that pre-exploitation isn’t a speed bump — it’s a strategic moment. The tools you use here will either enable the next ten days of progress… or guarantee ten days of pain.
💥 Exploitation — Turning Access Into Leverage
If pre-exploitation is the part where you collect the map and gather your tools,
then exploitation is where you begin redrawing the battlefield itself. This
phase isn’t about “getting in” — you’re already in. Now, it’s about
In CPTS, exploitation is not a monolithic step. It spans several parallel domains — Active Directory, application layers, exposed services, web interfaces, and even binaries left behind by careless admins. Each domain offers its own set of footholds and escalation vectors, and your job is to methodically chain them into full compromise.
Let’s break it down and walk through the terrain you’ll master.
🏢 Active Directory Exploitation — Where Real Engagements Begin
In the CPTS exam, Active Directory is not a beginner’s playground. You’re placed inside a live, enterprise-like domain where misconfigurations are layered, trusts are complex, and privilege paths are anything but linear. You’re not expected to “pwn AD” in one shot — you’re expected to navigate it intelligently, respecting its architecture while bending it to your advantage.
🔍 Enumeration Lays the Groundwork
Before you try to abuse anything, you need to understand the structure of what you’re attacking. Enumeration isn’t optional — it’s foundational.
Use tools like:
- BloodHound + SharpHound: Not just for visuals — use targeted queries and custom filters.
- PowerView: To interrogate AD in real-time. Validate permissions, list GPOs, enumerate ACLs.
- NetExec: Your go-to for credential spraying, remote command execution, and quick access validation across the domain.
- ldapsearch / windapsearch / rpcclient: For low-noise, targeted extraction of domain information — especially helpful when you don’t want to run large collectors.
🧠 CPTS Tip: BloodHound lies sometimes. Always confirm edges with manual checks using PowerView or NetExec. CPTS loves throwing you paths that only “almost work.”
🎯 High-Impact AD Attacks You’ll Use
Here are the core techniques that actually make the difference in CPTS — these aren’t optional fluff.
- GPP Passwords:
- Crawl
\\\\domain\\SYSVOLforGroups.xml, then usegpp-decrypt. Great early foothold vector.
- Crawl
- Kerberoasting / ASREP Roasting:
- Use
GetUserSPNs.pyor Rubeus to extract service tickets. - Crack with hashcat or john.
- Know when it’s worth it: long, complex passwords = skip and save time.
- Use
- SYSVOL Pillaging:
- Never skip this.
- Look for scripts, creds, hidden base64, or unattended install configs.
- DCSync Attacks:
- If a user has
Replicate Directory Changes, dump the domain withsecretsdump.pyormimikatz.
- If a user has
- ACL Abuse:
- Enumerate users with
GenericAll,WriteOwner, or similar rights over other principals. - Use PowerView to confirm and abuse (e.g.,
Add-DomainObjectAcl).
- Enumerate users with
- Trust Abuse (Interdomain / Cross Forest):
noPac: Abuse Resource-Based Constrained Delegation misconfigs.
- PetitPotam + Relay:
- Trigger machine authentication to a relay server, capture hashes, and escalate.
- PrinterBug:
- Still a valid attack path when paired with NTLM relay techniques.
🧠 CPTS Tip: Expect to chain multiple “small” weaknesses. Rarely is one attack enough. For example: password reuse → low-priv domain user → ACL abuse → DCSync.”
🧰 Core Toolset for AD Warfare
- BloodHound + SharpHound: Mapping privilege chains
- PowerView: Deep AD interrogation and ACL validation
- NetExec: Lateral movement, credential testing, command execution
- Rubeus: Ticket management, Kerberoasting
- Impacket Suite:
secretsdump,GetUserSPNs,wmiexec,smbexec, etc. - ldapsearch / windapsearch / rpcclient: Lightweight enumeration and validation
- Mimikatz: Credential dumping, ticket extraction
- ADRecon / PingCastle / Snaffler / group3r: Recon of permissions, objects, and policy leaks
🧪 Application Exploitation — Chaining Real-World Mistakes
CPTS will challenge your ability to spot and exploit realistic application misconfigurations. These aren’t “fire and forget” CVEs. You’ll face apps where the missteps are subtle: exposed consoles, default creds, token reuse, insecure deployment pipelines.
It’s often less about finding a classic vuln and more about abusing business logic or admin laziness.
🧱 Applications to Expect (or Variants of Them)
The following is a overview of common vulnerabilities which can be present in these applications, but remember that there are many others:
- GitLab: Secret infos in repos, information disclosure
- Jenkins: Script console access, misconfigured jobs
- PRTG / Nagios / Splunk: LFI, default creds, unauthenticated RCE
- osTicket: File upload handling, LFI, information disclosure, or weak auth
- WordPress / Joomla / Drupal: Plugin-based RCE, XML-RPC abuse
- Tomcat / Axis2 / WebLogic: Deployable war files, default creds
- ColdFusion / DotNetNuke: Forgotten panels, insecure authentication logic
🧠 CPTS Tip: Test as anonymous, default user, and compromised user. Many bugs live behind login.
🧱 Services Exploitation — Don’t Skip the “Old School” Stuff
So many candidates skip service-level attacks. Don’t.
In CPTS, classic services like SMB, FTP, MySQL, and WinRM are deliberate entry points or pivot opportunities.
- SMB / NFS / FTP: Null sessions, public shares, writable paths
- MySQL / MSSQL / Oracle TNS: Unpatched auth, UDFs, weak user creds
- WinRM / WMI / SSH: Remote command execution with harvested creds
- TFTP / Rsync: Upload/download anything unauthenticated
- POP3 / IMAP / SMTP: Banner leaks, relay abuse, user/password brute-force
🧠 CPTS Tip: Try every known password on every exposed service. Don’t assume service A creds won’t work on service B.
🌐 Web Exploitation — Manual Inspection > Automated Scanners
While Burp Suite and ZAP are excellent, CPTS expects you to go beyond vulnerability scanning. You’ll be faced with authentication flows, session mismanagement, and subtle parameter manipulation.
Core Techniques:
- Auth flow dissection: Understand how sessions are created and maintained.
- Parameter fuzzing: ffuf, intruder, and Burp extensions.
- Privilege escalation: IDOR, role tampering, cookie manipulation.
- Upload abuse: File validation bypass → RCE via extensions or paths.
- Classic bugs: SQLi, XSS, LFI/RFI, XXE, mass assignment, command injection.
Tooling You’ll Rely On:
- Burp Suite: Manual testing, extensions like Logger++, Turbo Intruder.
- ffuf: For directories, vhosts, parameters. Pair with custom wordlists.
- Hydra: Brute force common login portals.
- cewl / username-anarchy / cupp: Smart wordlists for target-specific fuzzing.
🧠 CPTS Tip: Don’t just check for 200 OK. Analyze redirect behavior, error codes, and timing discrepancies — the real vuln may be in what the app tries to hide.
🔬 Binary & DLL Analysis (Minimal, But Tactical)
You likely won’t face full-on reverse engineering in CPTS, but you will encounter suspicious binaries — often as part of pillaging or misconfigured services.
Key activities:
- Extracting hardcoded secrets
- Detecting insecure file paths (DLL hijacking)
- Uncovering credential files or encoded API keys
Helpful tools:
strings,exiftool,PE-bear,dnSpy,pestudio,IDA Free
🧠 CPTS Tip: Only dig into binaries when you have a reason — don’t burn hours analyzing dead ends.
✅ Summary of What This Section Taught Me:
- Active Directory: How to validate privilege chains and build custom escalation paths
- Apps: Identify overlooked flaws beyond CVEs — real attacker behavior
- Services: Every protocol has a purpose — and a risk
- Web: Hands-on, logic-based attacks beat automated scans
- Tools: Don’t master every tool — master the right ones
CPTS exploitation is not about spraying exploits and hoping one hits. It’s about linking weak signals into strong chains. It’s about being persistent, methodical, and creative under pressure.
When all those pieces snap into place — and a previously unreachable system becomes your playground — that moment is unforgettable.
🔍 Post-Exploitation — Dominating the Host
If exploitation is where you break in, post-exploitation is where you settle in, map the valuables, and quietly take control. CPTS places a strong emphasis on the quality and completeness of your post-exploitation activities — because in real-life engagements, that’s where the real value lies for clients (and real risk lies for organizations).
It’s not enough to pop SYSTEM or root and walk away. You need to:
- Escalate your privileges
- Extract meaningful data (creds, tokens, secrets)
- Understand what the machine can reach
- Prepare for lateral movement, reporting, or persistence
This section explores what I learned about pillaging, privilege escalation, data extraction, stealthy enumeration, and host-specific tradecraft on both Linux and Windows systems.
🐧 Linux Post-Exploitation
Linux hosts may be easier to interact with compared to Windows, but CPTS makes them anything but trivial. Most Linux footholds start with limited user access and require creative thinking to escalate.
Let’s break it down:
🔎 Pillaging & Recon
Your first job: figure out where you are and what you have.
Always check:
/etc/hosts,/etc/passwd,/etc/group,/etc/shadow(if accessible)- Bash history:
~/.bash_history,/user/.bash_history,.zsh_history - Config files:
/var/www/html/config.php, .env, database configs, Apache/Nginx settings - Crontabs:
crontab -l,/etc/crontab,/etc/cron.d/,/etc/cron.daily/ - Docker & container clues:
.dockerenv,cat /proc/1/cgroup,docker ps - Secrets: Look in
/home/*/,/opt/, mounted NFS dirs,.ssh/,.git/,.vscode/,.kube/
🧠 CPTS Tip:
grepandfindand your best friends
📦 File Transfer Methods (Low OPSEC)
Getting tools in/out of a Linux host is a daily requirement. Here are the techniques that worked reliably under segmented environments:
- Python HTTP Server + curl/wget
- scp (if SSH is available)
- base64 encoding → copy/paste: Encode on attacker, paste to victim
- SMB shares using impacket’s smbserver.py
🧱 Privilege Escalation Techniques
These are some of the actual techniques I successfully used during CPTS — or saw viable during enumeration.
- Sudo Abuse
- SUID/SGID
- Capabilities
- Docker Group
- Cron Jobs
- PATH Abuse
- Kernel Exploits
- Python Library Hijacking
- Logrotate / Config Misuse
- Living Off The Land (GTFOBins)
- NFS no_root_squash
- Writable Shared Objects
- Tmux Hijack
- Screen Escalation
🛠️ Tools used:
linpeas.sh(always validate manually after)pspyfor runtime job discovery- Custom privesc checklist (keep it host-agnostic and repeatable)
🪟 Windows Post-Exploitation
Windows is a whole different beast. You’re often dealing with:
- Defender
- UAC
- Group Policy controls
- Legacy software
- And a ton of volatile session data
Once you have low-priv access, your goals are similar: escalate, pillage, pivot.
🔎 Pillaging & Recon
Targets:
C:\Users\user\AppData\Roaming\: Look for saved creds, config files, session tokens- mRemoteNG, FileZilla, WinSCP: Stored credentials in config XMLs
C:\ProgramData\: Often contains unattended install files or auto-start configs- Registry: Autoruns, scheduled tasks, user info
- Browser creds: Chromium-derived browsers save tokens or cookies you can decrypt with DPAPI
- KeePass files:
*.kdbx, look forKeePass.config.xml - Outlook or RDP configs:
.rdp,default.rdp, cached user profiles
Use Seatbelt, WinPEAS, and JAWS — but don’t rely blindly.
Manual exploration + targeted registry searches often work better.
📦 File Transfer Methods (Low OPSEC)
Getting tools onto a Windows target is one of the most common challenges during CPTS — especially in segmented networks where outbound access is restricted or AV is alert. Here are the low-OPSEC techniques that worked reliably under pressure:
- PowerShell + Base64
- bitsadmin (native)
- certutil (native)
- SMB fetch via impacket-smbserver
- Evil-WinRM upload
🧱 Privilege Escalation Techniques
- UAC Bypass
- AlwaysInstallElevated
- DLL Hijacking
- Unquoted Service Paths
- Weak Service Permissions
- Modifiable Registry Autoruns
- Citrix Breakouts
- Clipboard Attacks
- SAM / LSA Secrets
- LSASS Dumping
- Named Pipe Abuse
- Restic Backup Config
- Legacy OS Exploits
🛠️ Tools used:
SeatbeltWinPEASfor wide collectionPowerUpfor automated checksSessionGopherfor session secretsWatson,Windows-Exploit-Suggesterfor known vuln scanningSysinternalssuite (especiallyAutoruns,Procmon,PsExec)Lazagnefor credentials hunting
🧠 CPTS Tip: Create a privesc template. Log each finding, tool used, test attempted, and result. Repeatable methodology is key.
🧰 Cross-Platform Considerations
- Living off the land is king: CPTS heavily rewards native tool usage. If you’re dropping random binaries, expect friction.
- File Transfer Techniques should work both ways — exfiltrate configs, logs, screenshots.
- Pillaging is not optional: Every host should be fully scraped. Most lateral or escalation paths depend on data from the host.
🗃️ Organizing Loot
Every machine should have its own loot directory with:
/loot
/host1
    creds.txt
    screenshots/
    shell_history.txt
    tokens.txt
/host2
...
Structure and documentation is just as important as the hacks themselves. It’ll save you in the report phase.
✅ Summary of What This Section Taught Me:
- Don’t run WinPEAS / linPEAS first: Do it manually first. You’ll find more and learn more.
- Credentials = Keys: Every secret you find can unlock the next door. Chain them.
- Privilege Escalation ≠ The End: It’s just the beginning of pillaging and lateral movement
- File Transfer ≠ Afterthought: Master it early — it’s essential for efficiency
- Log Everything: Commands, paths, screenshots, hashes — everything might matter later
Post-exploitation in CPTS is a discipline.
It’s about control, not chaos. Precision, not panic. This is the point in the engagement where
you stop feeling like a CTF player and start thinking like an attacker with objectives.
🔁 Lateral Movement & Pivoting — Expanding Control Across the Network
Once you’ve gained an initial foothold and escalated privileges on a box, you’re not done — you’re barely getting started. In CPTS, true mastery comes when you can treat each host not as an endpoint, but as a jumping-off point. The target network is segmented. Resources are isolated. And if you want those 12+ flags, you will have to move — often silently, and strategically.
This section covers everything I learned about pivoting techniques, tunneling tools, lateral movement through protocols, and navigating segmented AD environments. It’s one of the most technically demanding but deeply satisfying parts of the CPTS experience.
🕸️ The Two Sides of Movement
There are two categories of movement in CPTS:
- Lateral Movement: Transitioning from one system to another using valid credentials, tokens, trusts, or abuse of protocol features.
- Pivoting: Creating network-level access paths (tunnels) to reach otherwise inaccessible hosts or services through compromised assets.
You need to excel at both. Let’s tackle them one by one.
🧬 Lateral Movement — AD & Beyond
Lateral movement in an Active Directory environment is about abusing trust, not exploits. You’re chaining together:
- Permissions (admin access or RCE)
- Protocols (SMB, WinRM, MSSQL, RDP)
- Authentication (Kerberos tickets, NTLM hashes, plaintext creds)
Here’s what CPTS forced me to master:
🪟 Windows Lateral Movement
- Pass-the-Hash (PTH): Use NTLM hashes to authenticate to SMB, WinRM,
etc.
🛠️ Tools:impacket,netexec - Pass-the-Ticket (PTT): Inject Kerberos TGT or TGS to move laterally as a
user.
🛠️ Tools:Rubeus,mimikatz - Token Impersonation: Abuse
SeImpersonatePrivilege(e.g. via Juicy Potato, PrintSpoofer) to impersonate tokens - RDP Reuse / Credential Session Reuse: Connect via RDP if
credentials are known (or
mstsc /restrictedadmin) - WinRM Execution: Silent, scriptable, and powerful once creds are in
🛠️ Tools:Evil-WinRM,NetExec,PowerShell Remoting - Named Pipe Impersonation: Local privilege escalation that can lead to lateral access when chained
- MSSQL Trusted Connection: If
xp_cmdshellis enabled and the SQL user has privileges, use it to move
🧠 CPTS Tip: CPTS loves WinRM — get extremely comfortable with it. Learn how to run commands, drop files, invoke PowerShell, and tunnel through it.
🐧 Linux Lateral Movement
Less common in CPTS but still relevant in mixed environments.
- SSH with stolen keys or known passwords: Look for
.ssh/id_rsa,.bash_history, hardcoded keys - Kerberos Pass-the-Ticket: If integrated with AD and you have TGT/TGS (from
Rubeusormimikatz)
CPTS occasionally gives you these hybrid paths. Don’t overlook Linux footholds as dead ends — check their reach.
🛰️ Pivoting — Routing Through Firewalls and Segments
Once you land on a host, you’ll find much of the network is not directly accessible. This is where pivoting shines.
Pivoting Techniques
- Local Port Forwarding: Forward local port to remote service (e.g., access internal web UI)
- Remote Port Forwarding: Make a remote service accessible to your attacking machine
- Dynamic Port Forwarding (SOCKS proxy): Route all tool traffic through SOCKS tunnel
- Reverse Port Forwarding: Useful when you're behind NAT or no inbound allowed
- Proxychains + SOCKS: Chain tools through SOCKS proxy
🧠 CPTS Tip: Not all tools respect proxychains natively (like
netexecwith WinRM), and alsoNmapoutput sometimes can be influenced.
🔧 Pivoting Tools I Used (And Loved)
- Ligolo-ng ✅
My Favorite : Lightweight, encrypted, SOCKS5 tunneling. Better than Chisel. No need for proxychains. Easy MTLS setup - Chisel: Still solid for TCP pivoting. Needs manual stability babysitting
- Proxifier (Windows): GUI-based routing of traffic through SOCKS
- Ptunnel-ng: ICMP tunnel when TCP is blocked. Situational
- Plink / Putty: Quick SSH tunnels with saved config
- rpivot / SocksOverRDP: For when you need pivoting inside RDP sessions
- sshuttle: For low-friction network-wide tunnel setups
- proxychains + tools: Only works with tools that respect DNS/SOCKS resolutions
- netsh: For Windows port forwarding and firewall rules manipulation
- meterpreter / reverse_tcp: Only for quick PoC or fallback — not ideal for stealthy ops
🧠 CPTS Tip: Ligolo-ng became my default tunneling stack by Day 3. Stable, fast, encrypted, and less prone to dying when pivot boxes rebooted.
Recommendation: Use Ligolo-ng from the start. Learn how to automate the setup, run as service, and keep credentials embedded for stealth relaunches.
🔁 Recon After Pivot
This cannot be overstated: every time you pivot, redo your entire recon process.
Checklist:
nmapscans from the new vantage point- Check for internal-only HTTP/S, MSSQL, WinRM, etc.
- Fuzz internal web apps
- Run BloodHound collectors if domain-joined
- SMB/LDAP/WinRM scans for newly visible hosts
- Check routing table to confirm reachability
Your world has changed — so should your map.
✅ Summary of What This Section Taught Me:
- Every host is a gateway: Think of each box as a transit point, not a destination.
- Tunnels fail — plan for resilience: I had to rebuild Ligolo tunnels 3–4x. Automate scripts and take notes.
- DNS resolution is key: Use /etc/hosts, resolv.conf, or custom DNS settings inside tunnels.
- Proxychains ≠ magic: Test your tools under proxy first. Some ignore SOCKS.
- Segmented networks are a feature: CPTS wants to test your operational logic. Accept the complexity.
- Re-enumeration beats blind testing: With each new segment, there are hidden services just waiting to be seen.
Lateral movement and pivoting are not “advanced topics” in CPTS.
They’re essential. Without mastering both, you cannot pass.
✴️ Reporting Starts Here
📝 Reporting & Documentation — Your Real Deliverable
Let’s be brutally honest: in the real world, your report is what clients see, not your shells. It doesn’t matter if you compromised domain admin, established multi-hop tunnels, or pulled secrets from 15 systems — if you can’t explain it clearly, professionally, and impactfully, it didn’t happen.
Hack The Box understands this. That’s why the CPTS exam doesn’t end when you capture the twelfth flag. It ends when you submit a structured, professional, client-grade report. The report is manually reviewed, and a poor one — even with all the flags — will result in failure.
This section covers everything I learned about building, structuring, and writing a real-world penetration test report under pressure. I’ll break down the structure I used, the methodology behind documentation during the exam, the tooling that made life easier, and the strategies that helped ensure I didn’t panic-write the report on Day 10.
📋 Understand the Expectations
HTB expects your report to simulate a real-world deliverable, meaning it must:
- Be clear, concise, and easy to follow
- Include business impact and remediation, not just tech jargon
- Be written in a formal tone appropriate for stakeholders
- Stand on its own — no follow-up explanations allowed
- Be fully supported by evidence (screenshots, commands, proof)
- Use structured formatting, not a chaotic walkthrough
- Write in third person (eg. “the tester did this”), never in first
In other words, this isn’t a write-up, it’s a penetration testing engagement report.
📐 Recommended Structure
Here’s the high-level structure I followed and suggest:
- Executive Summary
- Brief description of objectives, timeline, scope
- General findings: types of vulnerabilities, lateral movement paths
- Risk rating overview
- Methodology
- Overview of how the test was conducted
- Tools used (with justification if non-standard)
- Approach: reconnaissance, exploitation, privilege escalation, lateral movement, post-exploitation
- Internal Network Compromise Walkthrough
- Detailed walkthrough of the entire kill chain
- Needs to be technical and contain screenshots, commands and techniques used
- Remediation Summary
- Overview of remediation plan for each finding + some general recommendations
- Needs to contain short / medium / long term remediation
- Findings (One per Compromise or Vector)
- Title: Clear and short (e.g., “SMB Share with Reused Domain Admin Creds”)
- Affected Component(s): IP, hostname, user or application
- Severity: Critical / High / Medium / Low / Info
- Description: What it is, why it matters, how it works
- Impact: What an attacker could achieve through it (tied to business logic if possible)
- Reproduction Steps: Step-by-step, command-by-command guide to replicate
- Evidence: Screenshots with alt-text, tool outputs
- Remediation: Practical advice, not “just patch it”
- CWE
- CVSS
- Appendices
- Hashes of found flags
- Changes / Host cleanup
- Compromised users
- Exploited hosts
- Discovered subdomains
- Discovered hosts and services
You can follow the example report provided during the exam.
🧠 Write the Report as You Go — Not After
This is non-negotiable.
If you wait until Day 10 to start writing, you will:
- Forget key steps
- Misplace screenshots
- Panic over syntax or incomplete evidence
- Risk missing required remediation sections
Instead, I used a trigger-based workflow.
Every time I:
- Gained a foothold
- Escalated privileges
- Pivoted to a new host
- Captured a flag
- Found a misconfig worth writing up
- Compromised a user
…I wrote the corresponding report section immediately. Screenshots were dropped into named
folders, commands logged, and notes copied into a markdown structure.
This turned Day 10 into a polishing session, not a writing marathon.
🖥️ Screenshot Hygiene and Command Logging
This might sound like overkill, but here’s how I maintained evidence discipline:
📸 Screenshots
- Saved into folders named by IP/hostname (e.g., 192.168.15.23 or DC01)
- Named numerically with short labels:
01-login.png ,02-foothold-shell.png ,03-hash-dump.png - Used alt-text in the report to describe what’s being shown
- Ensured every command or exploit had a corresponding screenshot
📜 Commands
- Logged every step in a plain text file for each host
- The exact command
- The context (user, host, privilege level)
- Notes on what the output meant
- Color-coded key outputs in report (with monospace font for clarity)
🧠 CPTS Tip: Use script or asciinema to record terminal sessions. Even if you don’t use them directly, they help you backtrack.
🛠️ Tooling: SysReptor (Massive Help)
I used SysReptor structure my report. It’s a
free, report-builder that follows professional layouts (Pentest Standard, NIST-like structures,
etc.).
Why it helped:
- CPTS exam templates with consistent headings
- Easy drag-and-drop screenshots with alt-text
- Multiple export formats (PDF, Word, Markdown)
- “Finding” templates to re-use sections with consistent wording
- Risk matrix automation
- Don’t need to build all report’s structure
You don’t have to use it, but I strongly recommend it over building from scratch or wrestling with Word at midnight.
🧠 CPTS Tip: You can build a basic “boilerplate” report before the exam begins, with empty sections pre-labeled by host and scenario.
🔍 Writing Style Tips
- Use plain English for clarity. Even technical readers appreciate clean writing.
- Write for the least technical stakeholder — not the red teamer next to you.
- Every finding should answer:
What happened?
Why is it bad?
How can it be fixed? - Don’t assume the reader has terminal access — explain every step
Avoid:
“I ran linPEAS and saw something interesting”
“I used BloodHound and found DA path”
“The hash was cracked and I got in”Instead:
"A misconfigured GPO allowed low-priv users to write to the startup folder of a domain controller. By dropping a scheduled task script, the tester achieved SYSTEM access and pivoted into the core domain segment.:
🚨 Don’t Chase Flags 13 and 14 Until Your Report Is Rock-Solid
Once you hit 12 flags — pause. Reassess your report:
- Are all findings fully documented?
- Are there screenshots for every step?
- Are you confident a reviewer could follow and verify everything?
- Are there missing remediations?
- Have you proofread for clarity, structure, and grammar?
Only once you’ve locked that down should you even consider going for flags 13 and 14.
🏁 There’s no extra credit for getting all flags if your report is weak.
✅ Summary of What This Section Taught Me:
- Write as you hack: Avoids the Day 10 panic
- Screenshots aren’t optional: They’re how you prove things happened
- Add commands for easy copy-paste other than screenshots: Reviewers appreciate it
- Alt-text and labeling = professionalism: Reviewers appreciate clarity
- Remediation isn’t just “update X”: Provide client-viable solutions
- SysReptor saves time and sanity: Structured workflow pays off big
- Report is 50% of the grade: Many people fail here, even with flags
✴️ Anti-Stuck Methodology Starts Here
🚧 Getting Stuck: Roadblocks, Mental Loops & Tactical Recovery
One of the most under-discussed — but absolutely critical — aspects of the CPTS exam is dealing
with cognitive friction. Getting stuck is not a fluke; it’s part of the challenge.
There will be moments when your usual logic fails, your recon returns noise, or your go-to
exploits don’t work — and the exam starts to feel like a psychological endurance test.
Expect it. Plan for it. This section is here to help you build a mental defense layer for
exactly those moments.
🔢 CPTS Roadblocks: Flag 1, 3 and 9
Some flags in CPTS are technical walls — they require chaining, lateral thinking, or multi-stage compromises. Others are psychological walls — they’re designed to break your rhythm and inject doubt into your process. Three flags stand out in both categories:
🧱 Flag 1 — The Cold Start Filter
Flag 1 is where many candidates stall for days. You’ll likely have dozens of services, paths, domains, and partial leads — but nothing just works.
It tests:
- How you prioritize weak signals
- Your willingness to go deeper, not broader
- Your ability to revisit assumptions without spiraling
Why it hurts: You expect the first flag to be quick, a way to build momentum. Instead, it stops you cold. This triggers self-doubt early in the exam.
🧩 Flag 3 — The Puzzle
By the time you reach Flag 3, you likely have:
- A shell (or two)
- A few creds
- A foothold in one segment
This flag challenges you to turn that foothold into lateral movement — often through a subtle privilege escalation vector, hidden share, or re-use of credentials on an unexpected protocol.
Why it hurts: You think you’ve done everything right — enumeration, privesc, loot — but still can’t move forward.
🔥 Flag 9 — The Mental Breaker
This is the exam’s “boss fight.” It’s not just about technical complexity — it’s about fatigue. If you’ve made it here, you’re likely 20+ hours deep, with tunnel vision creeping in.
Why it hurts: You’re technically capable of solving it, but your brain is fogged. You’re emotionally invested, sleep-deprived, and desperate for a win.
🧠 Think Dumber: Simplify Before You Complicate
A common phrase echoed by CPTS veterans — and seen across Discord channels — is “Think dumber.” It doesn’t mean turning off your brain. It means resisting the urge to over-engineer.
🧩 Why We Overthink
The more technical you are, the more tempted you’ll be to:
- Invent complex chains out of thin air
- Assume everything is hardened unless proven otherwise
- Start chaining ideas without testing the fundamentals
Often, the solution is dumb — a plaintext password in a config file, an overlooked share, a forgotten virtual host.
🛠️ Simplify Your Thinking With These Questions
- What’s the least privileged user I haven’t tested with?
- Is there a low-hanging fruit I skipped because it seemed “too easy”?
- If this were a real misconfigured network, where would a junior admin mess up?
Don’t be afraid to test the obvious:
- Re-use credentials on RDP or WinRM
- Try anonymous SMB
- Look for creds in unattend.xml, .git, .env, or settings.php
Simplify first. Then escalate complexity.
🧰 My “Stuck” Toolkit
This is the toolkit I used whenever I felt like I had exhausted every option. Think of it as your “Break Glass in Case of Panic” strategy bank
🔄 Tactical Steps for Reorientation
- Re-enumerate everything from a new pivot.
- New network access means new visibility. That one dead service from earlier? It might now be reachable.
- Read your notes out loud.
- This seems silly, but it activates your verbal processing and can trigger “wait a second...” moments.
- Search the HTB Academy.
- If you’re facing a situation you can’t recall a solution for, chances are the answer is somewhere in the path. Use keywords. Read the full content — not just the cheatsheets. All you need is in the Academy.
- Sketch the attack surface.
- Draw it on paper. VMs, users, IP ranges, trust paths. You’ll often spot missing links when you visualize.
- Ask these two questions:
- “What is this system trying to protect?”
- “If I were an admin, where would I hide this misconfiguration?”
- Turn off the monitor. Lie down. Walk through the flow mentally.
- No distractions. Just you and your memory. This often resets stuck thinking.
- Take a shower.
- It sounds like meme advice — but I solved more than one flag mid-shampoo.
Why This Works
Getting stuck isn’t always a technical problem. It’s a cognitive bottleneck. You’re juggling:
- Enumerated data
- Half-executed ideas
- Sleep deprivation
- Impostor syndrome
Your job is to build routines that reset your mental stack. This toolkit is how you do that.
🧠 Smart Tools, Smarter Thinking
Let’s talk about the elephant in the terminal: ChatGPT.
Yes, you can use it. No, it’s not cheating. But it’s also not magic, and if you blindly trust it
during the exam, you’ll end up in a recursive loop of bad suggestions and false confidence.
✅ When It’s a Life-Saver
ChatGPT shines when used as a:
- Syntax helper (e.g., “What’s the correct PowerView cmdlet to list domain trusts?”)
- Snippet generator (e.g., “Python socket reverse shell that works on Linux?”)
- Workflow explainer (e.g., “What’s the standard way to use ldapsearch for users?”)
- Alternative thinker (e.g., “List common reasons SQLi fails despite vulnerable parameter”)
Sometimes, just describing your situation in plain English to ChatGPT can help reframe the problem in your head, even if its response isn’t perfect.
❌ When It Can Sabotage You
The model can (and will) hallucinate:
- Completely fictional command options
- Wrong outputs or behaviors for tools like NetExec, Rubeus, or smbclient
- Overconfident dismissals of valid ideas (This has happened to me.)
🧠 How to Use It Effectively
Treat ChatGPT like a well-meaning but unreliable junior analyst:
- It’s fast.
- It’s full of ideas.
- It has massive recall of techniques.
- But you have to verify everything.
Checklist for safe ChatGPT use:
- Use it to recall technique names or flags, not to generate critical attack steps.
- Cross-check technical outputs (commands, syntax) with man pages or tool help menus.
- If it dismisses a technique, verify with a second source before abandoning it.
✴️ Final Reflections Starts Here
🎓 Final Reflections & What’s Next
Passing the CPTS was never just about getting another badge for my LinkedIn or proving to myself that I could grind through ten days of pentesting. It was about taking the methodology I had built over months of preparation, stress-testing it in an unfamiliar, hostile environment, and seeing if it could hold under real pressure.
The answer? It did — barely at times, gloriously at others. And what I took away from CPTS wasn’t just technical prowess. It was a profound shift in how I think about offensive security.
🧠 I Think Differently Now
Before CPTS, I approached pentesting with a CTF mindset: binary challenges, point-and-shoot
exploits, isolated problems. But CPTS changed that.
Now I see:
- Infrastructure, not just hosts — each machine exists within a living ecosystem
- Trust boundaries — who trusts what, and why, and how that can be abused
- Misalignments between configuration and policy — where intentions fall short
- Realistic attacker goals — not getting “root,” but reaching objectives quietly
It’s subtle, but it’s a seismic shift. I no longer see machines as challenges to solve — I see
them as interfaces to the organization’s nervous system.
And that’s what real adversaries do.
🧰 The Tools I Built Became My Default Stack
I didn’t just “use” tools during CPTS — I built workflows and habits around them that now form the backbone of my daily red teaming work.
- Obsidian: My entire methodology lives here. Organized, cross-linked, searchable, and persistent.
- SysReptor: Faster than Word, cleaner than Markdown, and far more scalable for engagements.
- Ligolo-ng: I don’t bother with Chisel unless I have to. Ligolo-ng is now my go-to tunneling solution for SOCKS5 chains, dynamic port forwarding, and multi-hop routes. Fast, stable, encrypted, and scriptable.
- NetExec: The spiritual successor to CrackMapExec, and my constant companion for sweeping credentials, enumerating shares, and finding low-hanging fruit fast.
- PowerView / BloodHound: Still unmatched for AD abuse — but now I don’t just trust edges, I validate them with PowerView and context-aware recon.
These weren’t just “exam tools” — they’re now embedded in my tradecraft.
💼 Would I Recommend CPTS?
Yes — emphatically, but with caveats.
CPTS is not for beginners. It assumes:
- You’ve done at least 30–40 real boxes (HTB, THM, VulnHub)
- You know the basics of both Linux and Windows internals
- You’ve touched Active Directory before
- You understand the difference between a tool and a methodology
If you’re past that stage and want to:
- Learn to think like a real internal attacker
- Simulate full-scale AD compromises, privilege chains, and pivot tunnels
- Build client-grade reports and deliverables
- Move beyond “I got root” and into “this is a business risk”
Then CPTS is absolutely worth it.
🧠 And if you’re OSCP-certified? CPTS won’t necessarily be harder — but it will feel far more
realistic. Less CTF. More client. More stress. More reward.
🙏 A Word of Thanks
- To the HTB Academy and exam devs — You nailed it. The CPTS is what I wish more certs were: realistic, immersive, and brutal in the best way.
- To the Discord community — You’re the sanity check, the morale boost, the reminder that we’re all in this together.
- To the folks who wrote their reviews before me — You made this guide possible. I’m paying it forward here.
🫵 And To You, Reader:
If you’re still reading this, you’re probably in one of three places:
- You’re curious about CPTS
- You’re preparing for it
- You’re deep into the exam and looking for reassurance
Here’s what I’ll say to each of you:
- Curious? Do it when you’re ready. Not before. Not to prove something. Do it because you want to level up the right way.
- Preparing? Build your notes like your life depends on them. They kind of do.
- In the exam? You’re not failing. You’re learning. Take a breath. Reread your notes. Re-enumerate. Reset your brain. Then go again.
🎤 Now, Back to the Terminal
The exam ends, but the work never does. There’s always a host to compromise, a report to write, a mindset to refine.
So whether you’re walking into your first client engagement, pivoting into a segmented network,
or just rebuilding a tunnel at 3 a.m. — trust your process, trust your notes, and keep
going.
You’ve got this.